
Congratulations on choosing CoopAI. This manual helps you get the most out of it, from your first chat to team-wide prompt libraries.
Why Coop
The context gap
Most AI coding tools only see the file you have open. You can use Coop the same way on a local file, and still ask about Slack, Jira, and docs. CoopAI also connects your code graph across every repo indexed for your team, so answers reflect how your org actually builds software, not just the current buffer.
By just using the beta version of CoopAI I have seen at least a 50% reduction in time I spend asking / answering questions… I spend at least 6 hours each week answering questions and cut that in half this past week. — Senior Engineer, Row Labs
Lightning Intelligence
CoopAI builds a secure cross-repo knowledge graph from webhooks and index jobs, not full monorepo copies on every laptop. Your source stays on your infrastructure.
Developer (free) includes full tool connectivity (code hosts and collaboration integrations via the admin portal), Deep-Index on up to 3 repos org-wide, workspace repos, chat, and quick actions in production mode, with AI usage limited to 15 messages per rolling 6-hour window, plus $1.75 per-window and $7 weekly spend caps. Accepted autocomplete suggestions count as one message. Pro adds unlimited Deep-Indexed repos, team seats, Collections, and higher seat-based limits.
Quick actions at a glance
| Action | What it does |
|---|---|
| Understand Repo | Repo-wide architecture, subsystems, and risks — requires Use repo (ignores a file chip) |
| Trace Decision | Why this code exists — pull rationale from commits, PRs, and team context |
| Find Owner | Who owns this area and the escalation path when you need a human |
| Blast Radius | Impact of changing this code — integrations, APIs, and operational risk |
| Knowledge Gaps | Missing context and blind spots before you ship |
Trust and data handling
| Badge | Meaning |
|---|---|
| No model training | Your code is never used to train models |
| Zero-retention routing | Enterprise-confidential context with retention flags disabled |
| Keys on your server | LLM provider keys stay server-side, not in the IDE |
| BYOK ready | Route inference through your own provider accounts |
See the Security page for architecture details.
Get Started
Developer (free) signup
- Browser — Go to coop-ai.dev/signup/free, enter your work email, and create a password (or continue with Google).
- Browser — Verify your email if prompted.
- Extension UI — Install the VS Code extension (see below) and sign in under Settings → Account — Continue with Google or Continue with email (same address as signup).
- Browser — Optional: open the admin portal with the same email/password or Google to manage your personal account.
Marketing Sign in opens VS Code. coop-ai.dev/login does not sign you in on the web. Enterprise developers use Sign in with SSO in the extension; org admins use Continue with SSO on the admin portal.
Forgot your password? Use Forgot password on the website or admin portal, or the Forgot password? link in the extension.
Enterprise checkout
- Browser — Choose a plan on Pricing and complete Stripe checkout.
- Browser — On the Welcome page, wait for provisioning (usually under a minute).
- Email — Check your inbox for your account welcome email.
- Browser — Admin portal — Open admin.coop-ai.dev/login. Sign in with email/password, Continue with Google, or (Enterprise) enter Organization name → Continue with SSO. The marketing Sign in page opens VS Code — it is not a web login.
- Admin portal — Connect GitHub (GitHub App on company org — use Send link to GitHub admin if IT owns GitHub), Slack, and other tools once for your whole org.
- Admin portal — Invite teammates from the Users page (or rely on IdP JIT after SSO is configured).
- Extension UI — Developers install CoopAI in VS Code and sign in with Continue with Google, email/password, or Organization name + Sign in with SSO (Enterprise).
Enterprise onboarding timeline
Typical sequence for a new Enterprise org (org admin + IT). Adjust for your IdP and GitHub ownership.
| Phase | Owner | Tasks | Target |
|---|---|---|---|
| Week 0 — Provision | Coop / billing | Stripe checkout, welcome email, admin account | Day 1 |
| Week 0 — SSO | IT + org admin | IdP SAML app with Coop SP values (step 1) → admin Settings → Single sign-on → paste IdP config (step 2) → Test connection → enable Require SSO (step 3) when ready | Day 1–3 |
| Week 1 — Integrations | Org admin (+ GitHub admin if needed) | Admin portal Integrations — GitHub App, Slack, Jira, etc. | Day 3–7 |
| Week 1 — Indexing | Org admin | Indexing → Deep-Index company repos; set Repository access mode | Day 3–7 |
| Week 1 — Users | Org admin | Users → invite or rely on IdP JIT; assign per-user repo grants if using Per-user grants | Day 5–10 |
| Week 2 — Validate | Developers + admin | Extension sign-in (SSO), Workspace repo, quick actions, autocomplete smoke | Day 7–14 |
Detail: Single Sign On (SSO), SAML SSO troubleshooting, admin portal, and operator guide docs/enterprise-integration-onboarding.md.
SSO-only org playbook
Use this when Require SSO is enabled in Settings → Single sign-on → Sign-in policy (password and Google blocked for new interactive sign-ins and token refresh).
- Browser — IdP — Provision users in Okta / Entra / your SAML IdP with an email attribute (or email-format NameID). Map the same email your org uses in Coop.
- Browser — Admin portal — Settings → Single sign-on → complete steps 1–2 (SP values into IdP, paste IdP Entity ID / SSO URL / cert) → Save SSO → Test connection with your admin identity.
- Browser — Admin portal — Step 3: enable Require SSO only after a successful test. Coop shows a confirmation — a misconfigured IdP can lock everyone out. Enabling Require SSO also ends existing password/Google sessions for the org (SAML sessions stay). Allow email and password and Allow Google are hidden while Require SSO is on.
- Browser — Admin portal — Users → promote at least one SSO user to admin if JIT created them as member (first SAML login defaults to member).
- Browser — Admin portal login — All admins and members sign in at admin.coop-ai.dev/login with Organization name + Continue with SSO. Do not expect coop-ai.dev/login to be a web SSO form — it opens the extension.
- Extension UI — Developers use Settings → Account → Organization name + Sign in with SSO (browser handoff; VS Code completes automatically). No password invite required for SSO-only orgs.
- Offboarding — Deactivate in Users. Reactivate on that row to let them sign in again (the seat stays theirs). Or automate
POST /v1/auth/saml/offboardfrom your IdP provisioning job.
Known limits: Enabling Require SSO revokes password/Google sessions and refresh tokens for that org (SAML sessions remain). Org API keys (coop_…) still authenticate automation under Require SSO — revoke keys when users leave. SAML sessions default to 12 hours with no silent refresh. Full error codes and limits: SAML SSO troubleshooting.
Repository access (Pro / Enterprise)
Org admins control which Deep-Indexed repos developers see in VS Code.
Browser — Admin portal → Settings → Repository access
| Mode | Behavior |
|---|---|
| All indexed repos | Every developer can use any repo the admin has Deep-Indexed |
| Per-user grants | Only repos explicitly granted on the Users page appear in the extension catalog |
Per-user mode is useful when company repos and personal forks share an org. Developers see a read-only message in Settings → Tools when access is admin-controlled.
Operator smoke test: repo docs/repo-access-smoke-test.md (npm run smoke:repo-access).
Install the VS Code extension
- Browser — Open the VS Code Marketplace listing for CoopAI (or use the install button on coop-ai.dev).
- Extension UI — Click Install, then reload VS Code if prompted.
- Extension UI — Open the Coop sidebar from the activity bar (Coop icon).
Sign in
Extension UI → Settings → Account
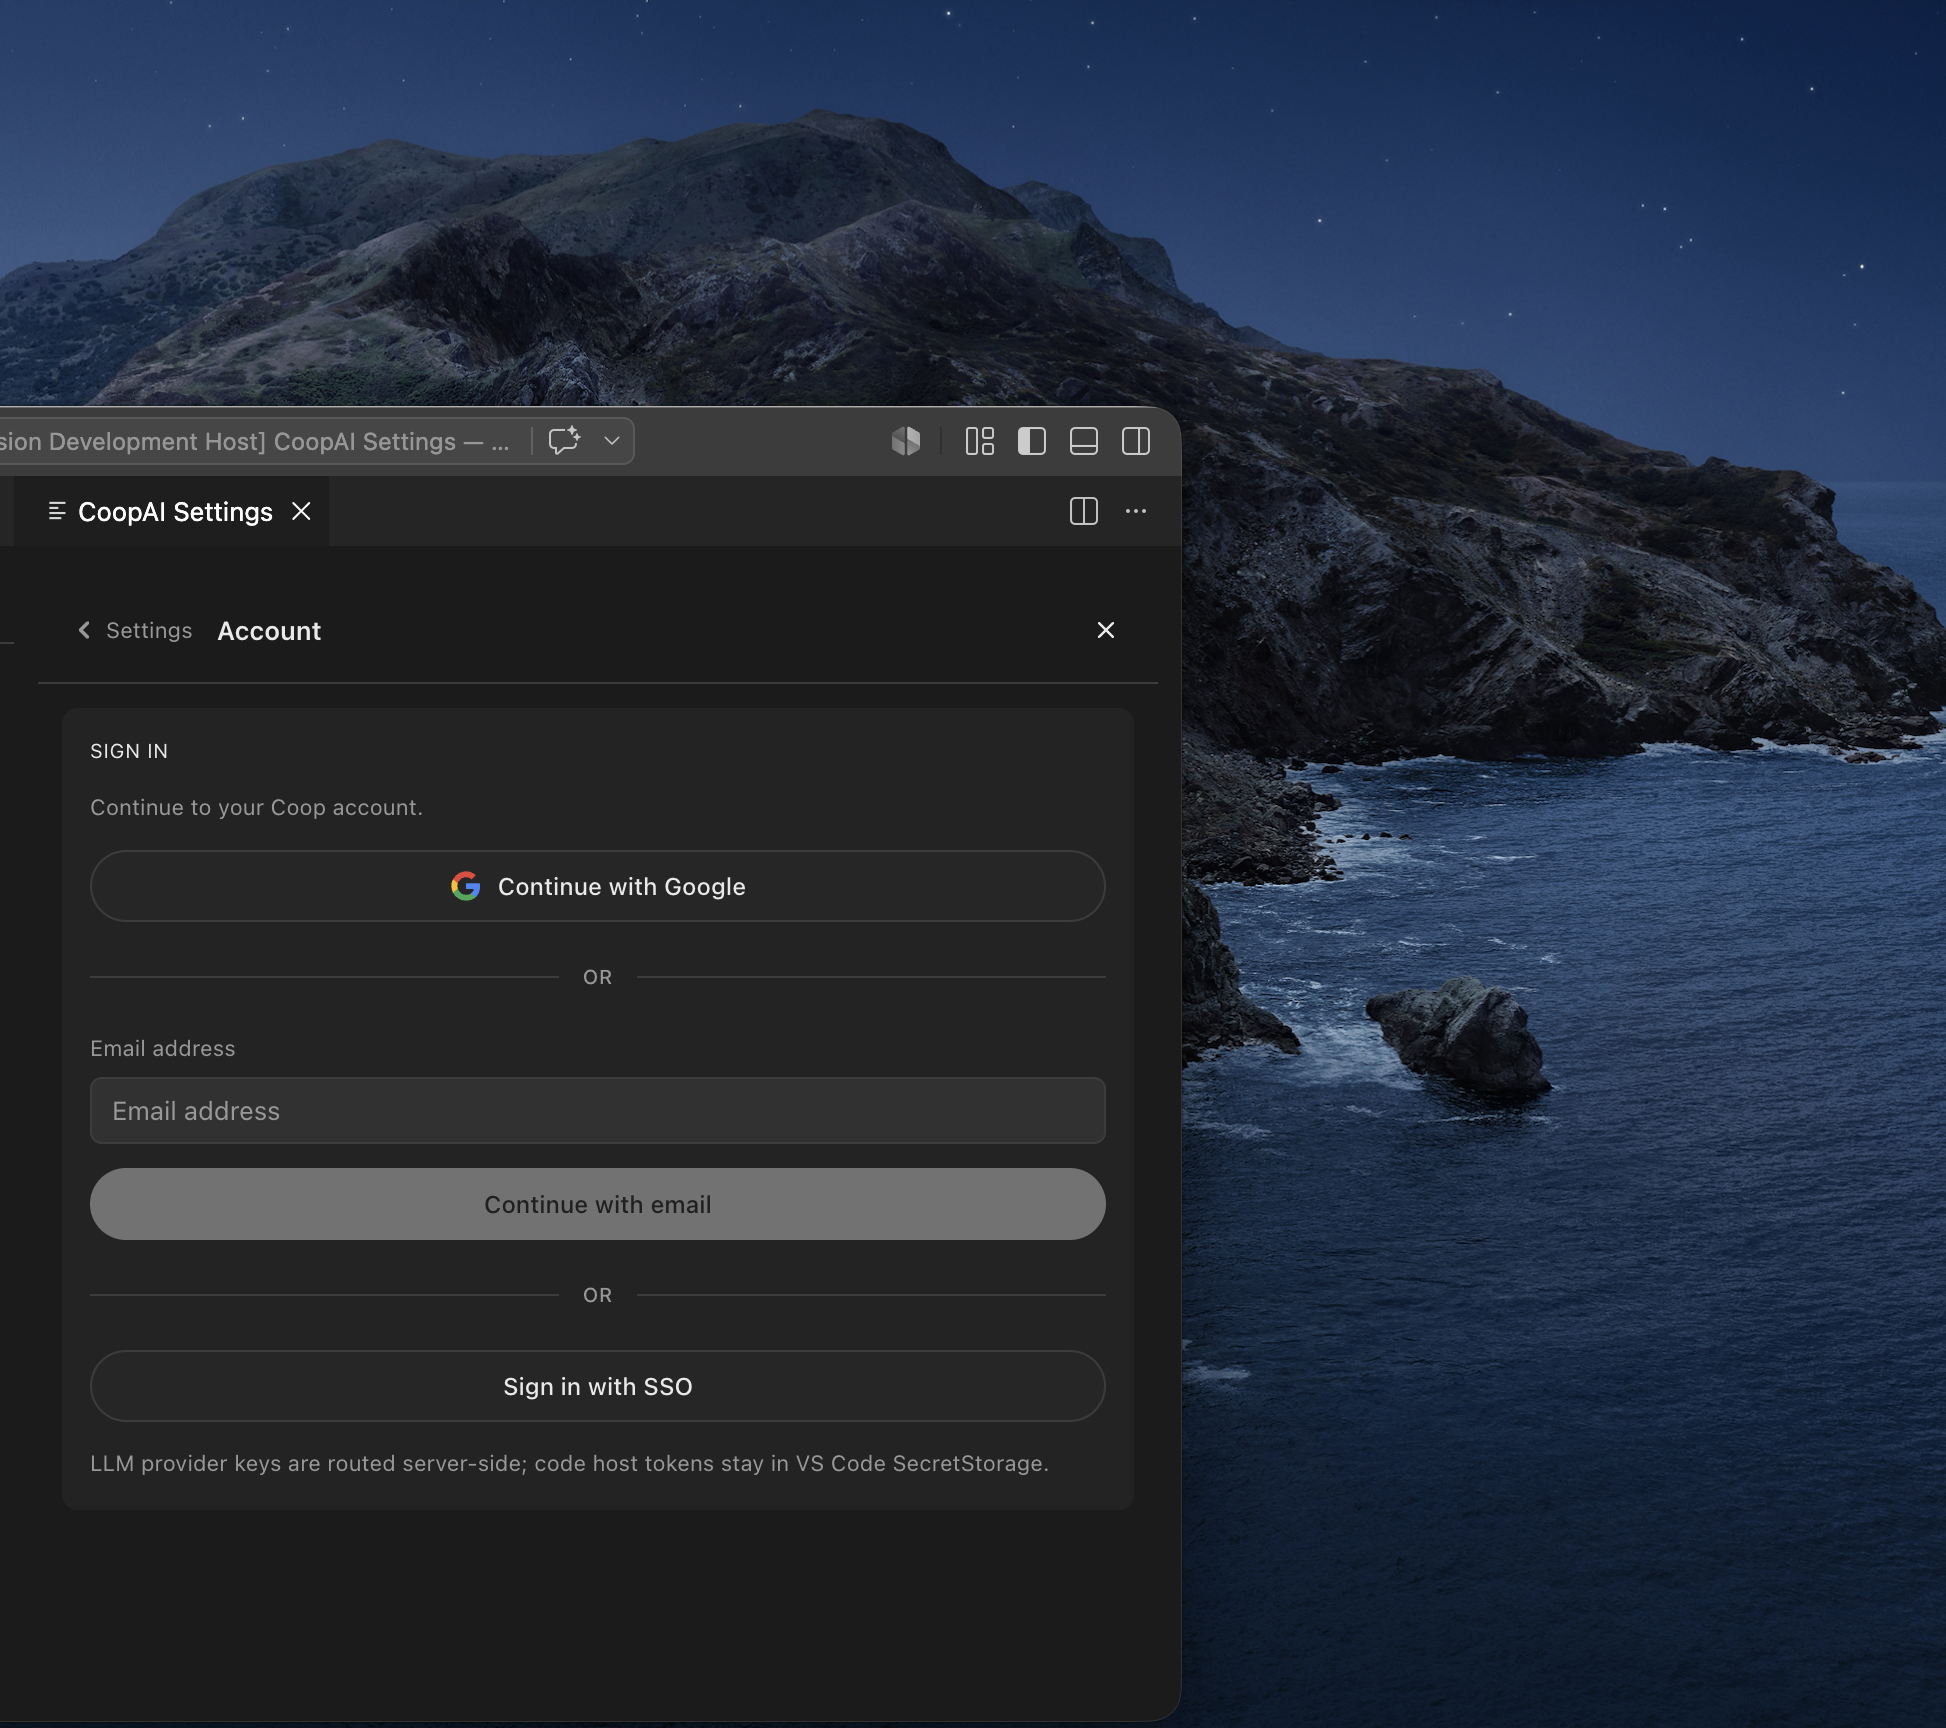
Three sign-in paths appear on one screen:
| Path | Steps |
|---|---|
| Continue with Google | Click the top button (Google icon) |
| Continue with email | Enter email → Continue with email → enter password → Sign in |
| Sign in with SSO | Enter Organization name → Sign in with SSO → complete sign-in in your browser (VS Code finishes automatically) |
Email is two steps (same pattern as ChatGPT / Claude):
- Enter your email address and click Continue with email.
- Enter your password and click Sign in.
- Use Forgot password? to reset, or ← Use a different email to go back.
Enterprise SSO requires your organization name before you click Sign in with SSO. Coop opens your system browser for IdP sign-in; when you finish, VS Code completes the session automatically. Organization name matching is case-insensitive. coop-ai.dev/login opens VS Code — for browser-based SAML, use the admin portal login.
After sign-in: Account shows your org and plan summary, plus Sign out.
Use coop-ai.dev/forgot-password if you need to reset your password outside the extension.
Automation API keys (coop_…) are for CI and scripts only — create them in the admin portal under Settings → API keys, not in the extension.
Set repository context
- Extension UI — Open Settings → Workspace.
- Pick an indexed repo from your org catalog and set Primary branch (e.g.
main). - Extension UI — Select the repository with Use repo (not a file). The three steps below match the screenshots under Understand Repo.
Understand Repo and /understand require that Use repo step — Settings owner/repo alone is not enough, and a file chip blocks the action. Find Owner / Knowledge Gaps can run with either a file chip or Use repo.
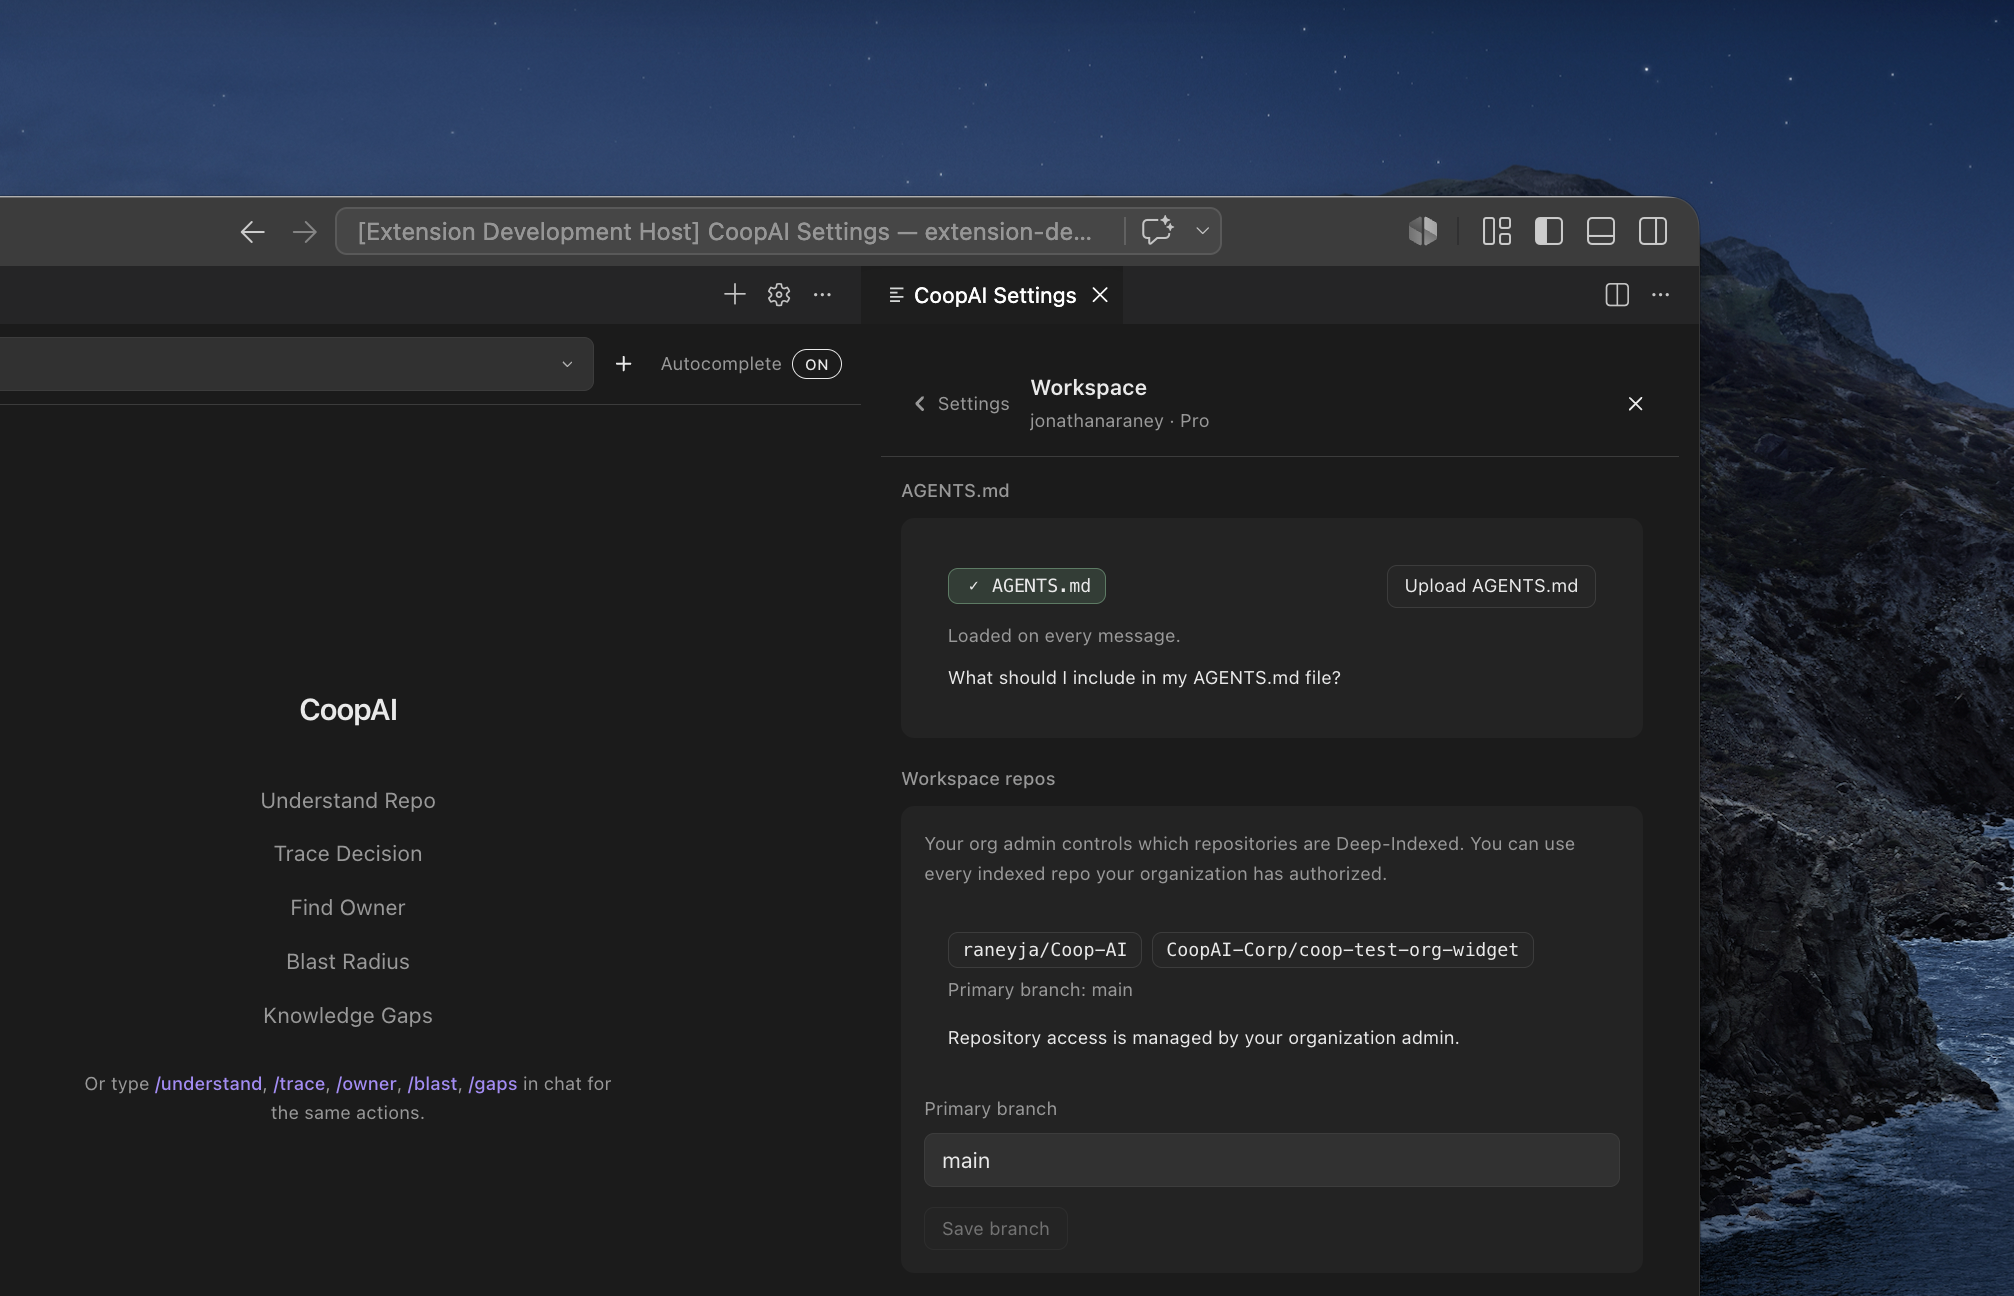
In production mode (coopAI.devMode: false), org admins connect code hosts in the admin portal — developers do not paste PATs.
Optional: connect integrations
Integrations (Slack, Jira, Confluence, Notion, Google Docs) power Trace Decision and Knowledge Gaps with cross-tool context.
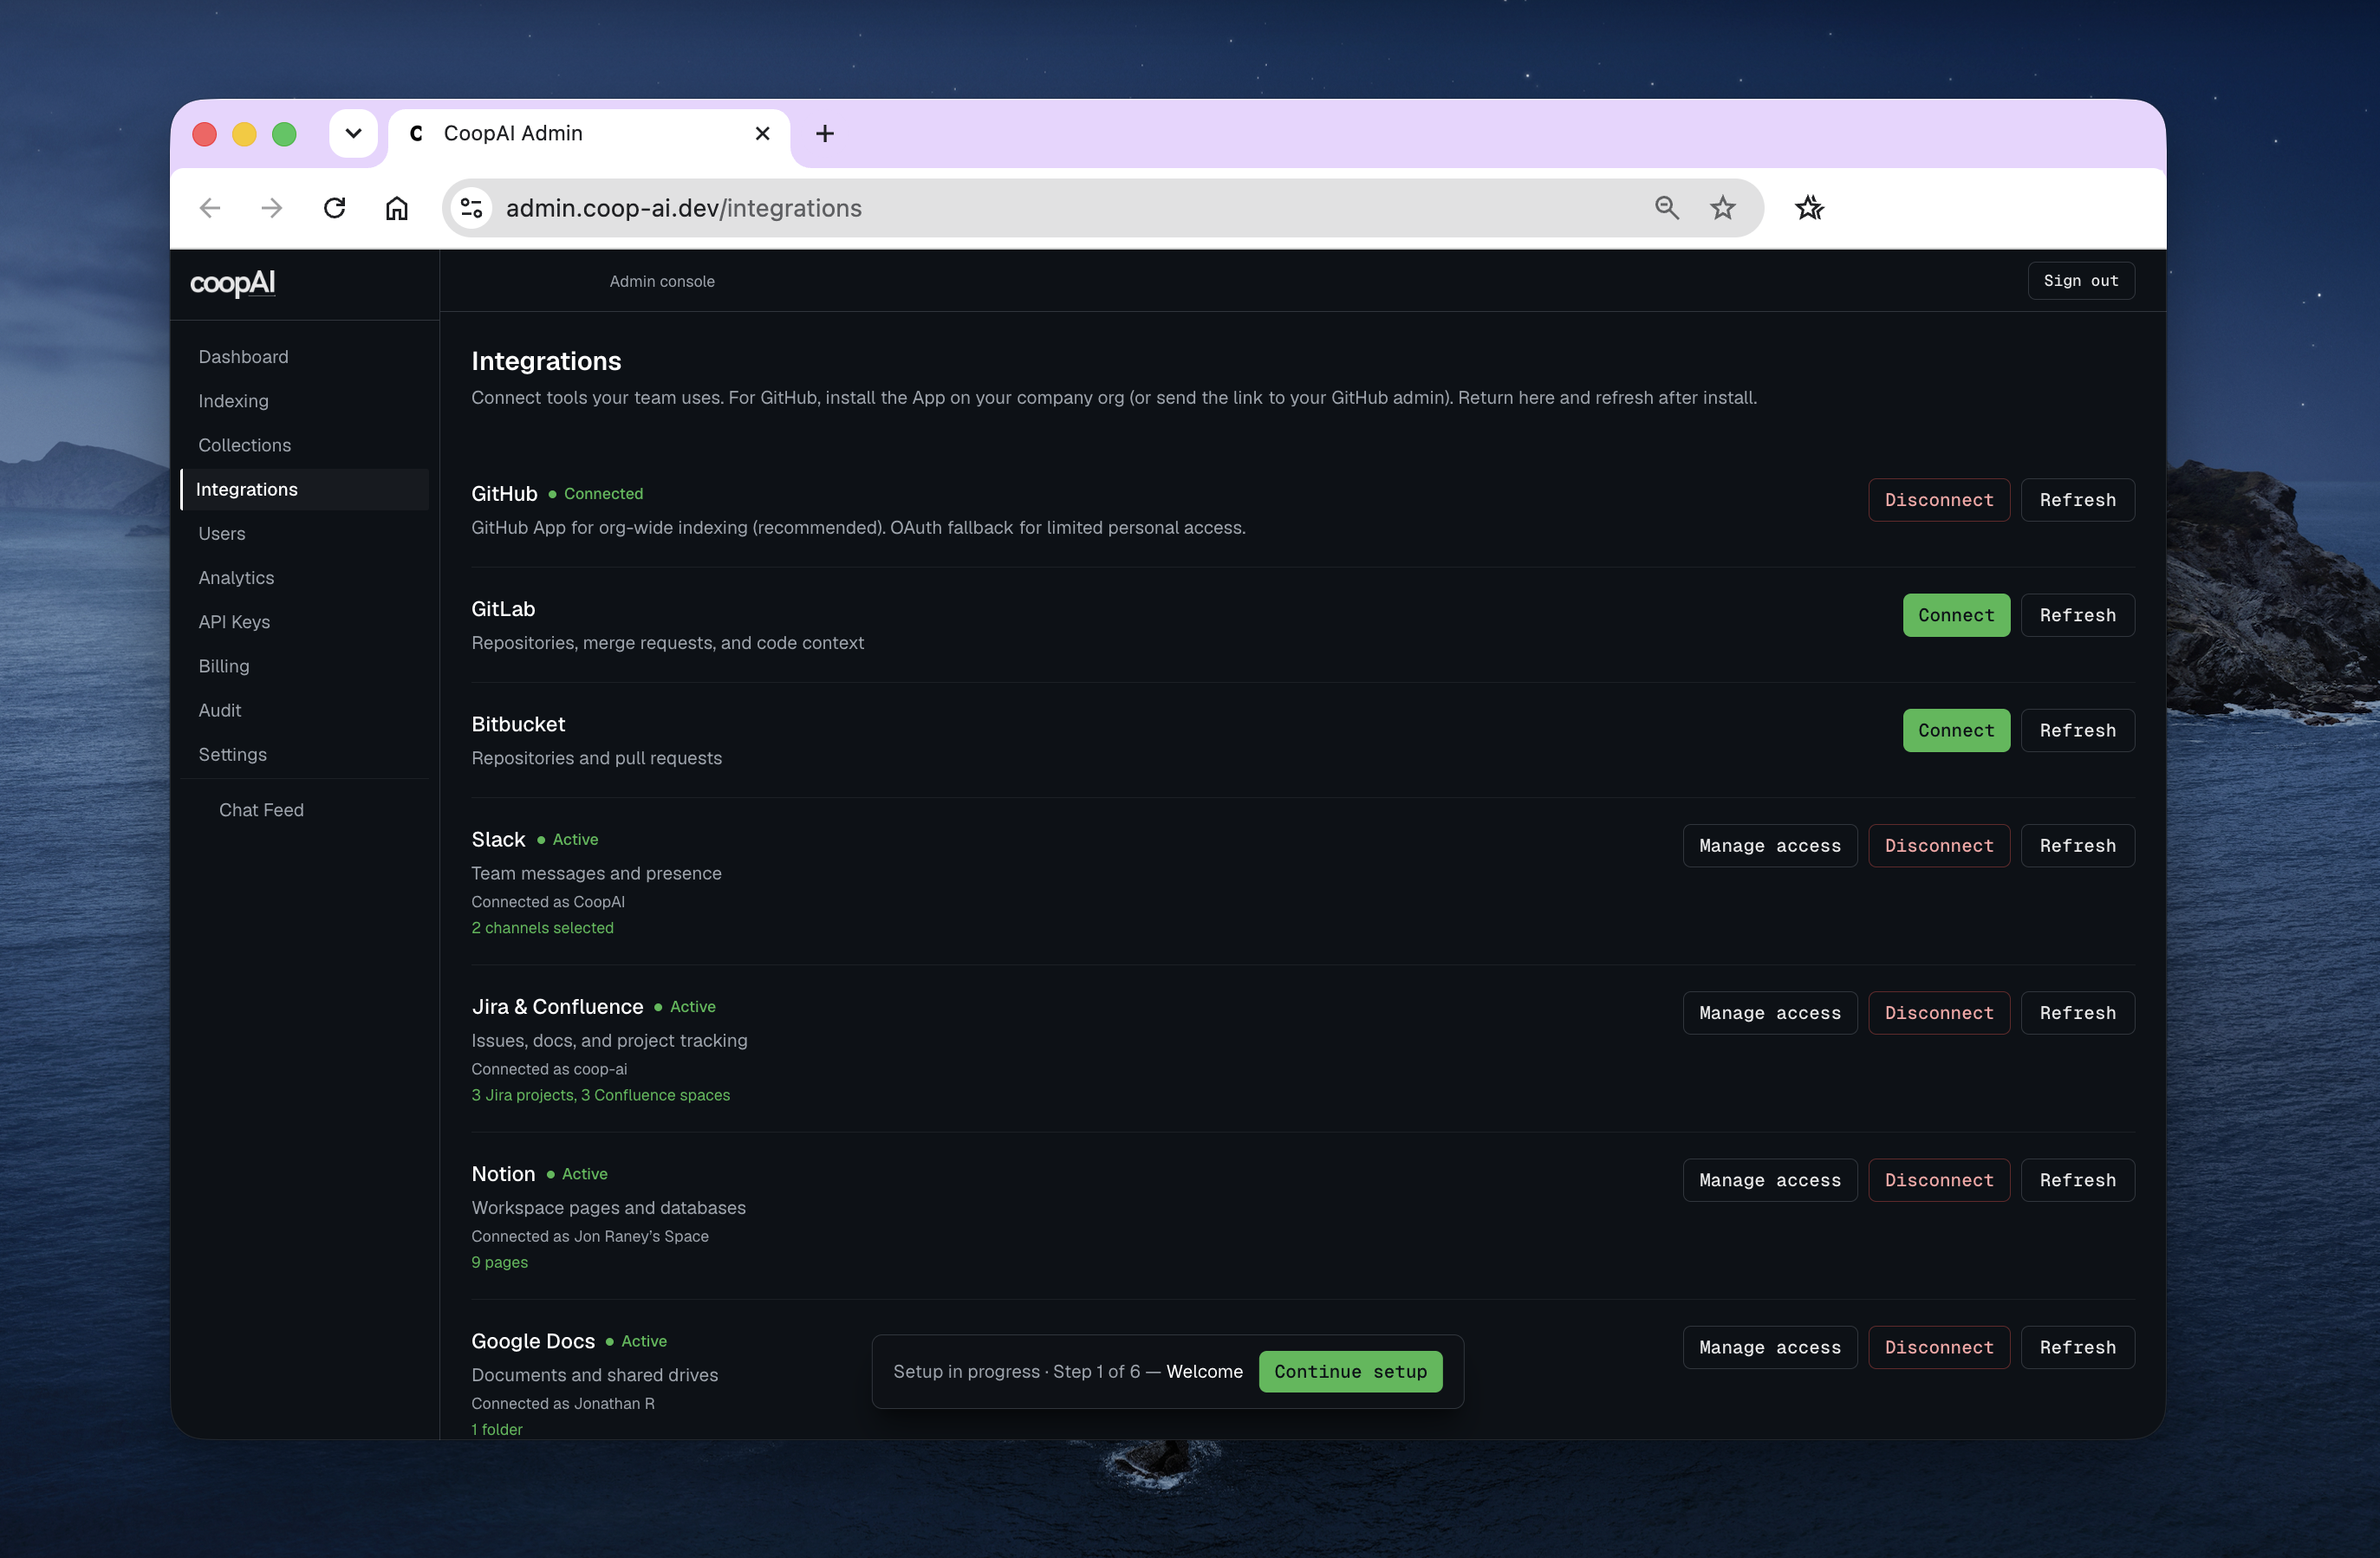
| Mode | Who connects | Where |
|---|---|---|
| Production | Org admin | Admin portal → Integrations |
| Developer mode | Individual | Extension Settings → Tools (PATs in VS Code SecretStorage) |
If integrations are not connected, Coop still works for code-only questions. Ask your org admin to connect tools for full cross-tool context.
Enterprise SSO
Enterprise orgs sign in with SAML 2.0 through your company identity provider (Okta, Azure AD / Entra ID, or generic SAML). SSO is available on the Enterprise plan only.
Where SSO works
| Surface | SSO available? | How |
|---|---|---|
| Admin portal | Yes | admin.coop-ai.dev/login → Organization name → Continue with SSO |
| VS Code extension | Yes | Settings → Account → Organization name → Sign in with SSO (browser handoff) |
| Marketing site (coop-ai.dev/login) | Opens VS Code | Sign in in the extension (SSO included). Org admins use the admin portal for browser SAML. |
Organization name matching is case-insensitive on both surfaces. IdP setup detail (Okta, Entra, generic): Single Sign On (SSO). Error codes and known limits: SAML SSO troubleshooting.
Admin portal login (SSO)
- Browser — Open admin.coop-ai.dev/login.
- Scroll past email/password and Continue with Google to the or SSO section.
- Enter your Organization name (exact name from billing or Settings → Account & organization).
- Click Continue with SSO — your browser opens your IdP sign-in.
- After authentication, you land in the admin portal dashboard.
Password and Google remain on the same page for orgs that have not enabled Require SSO.
Admin: configure SSO (3-step panel)
Org admins configure SAML at Settings → Single sign-on (/settings/single-sign-on). The panel follows three steps — match your IdP work to each:
| Step | Panel section | What you do |
|---|---|---|
| 1. Coop service provider | Top of page | Copy Entity ID, ACS URL, and Metadata URL into your IdP SAML app — or Download metadata. Share these with IT if they own the IdP. |
| 2. Identity provider | Middle form | Choose provider (Okta, Azure AD / Entra ID, or Generic SAML 2.0). Paste IdP Entity ID, SSO URL, and X.509 signing certificate. Check Enable SSO for this organization → Save SSO. |
| 3. Sign-in policy | Bottom section | Click Test connection (available when SSO is enabled). After a successful test, enable Require SSO to block password and Google (and revoke those sessions). Optionally keep Allow email and password / Allow Google while testing. |
If step 1 shows Service provider URLs unavailable, your Coop operator (not end users) must set COOP_PUBLIC_BASE_URL on the API server to the public backend URL (e.g. https://api.coop-ai.dev), then restart the API. This env var controls SAML callback URLs — it is operator infrastructure config, not something developers set in VS Code.
Full IdP walkthroughs: Single Sign On (SSO).
Admin portal settings hub
Settings is a hub with nested pages (not one long form). Open Settings in the sidebar, then choose a card:
| Page | Route | Who sees it | Purpose |
|---|---|---|---|
| Account & organization | /settings/account | All signed-in users | Profile, org info, sign-out |
| Repository access | /settings/repository-access | Pro / Enterprise admin | Per-user vs all-indexed repo grants |
| Single sign-on | /settings/single-sign-on | Enterprise admin only | SAML IdP config (3-step panel) and sign-in policy |
Extension: sign in with SSO
- Extension UI — Settings → Account.
- Enter your Organization name below the email fields (case-insensitive).
- Click Sign in with SSO — Coop opens your system browser for IdP login.
- Complete sign-in in the browser; return to VS Code. Account shows your org and plan when the session is ready.
Admin portal login uses the same org name with Continue with SSO on /login instead of Sign in with SSO.
Known limits (Enterprise SSO)
| Limit | Detail |
|---|---|
| Shared service provider | One Entity ID and ACS URL for all Enterprise tenants; org is resolved via RelayState at callback |
| API keys under Require SSO | Org API keys (coop_…) still work for automation — revoke on offboarding |
| Existing sessions | Enabling Require SSO revokes password/Google sessions immediately; SAML sessions stay until expiry |
| JIT default role | First SAML login creates a member — promote admins in Users |
| No session refresh | SAML sessions expire (default 12h); users re-authenticate through the IdP |
See SAML SSO troubleshooting — Known limits for the full list.
Using the Extension
Open the Coop sidebar
The Coop sidebar lives in the VS Code activity bar. When chat is empty, you'll see the CoopAI wordmark with a short hint to ask about the repo or type / for commands. Structured workflows (Understand Repo, Trace Decision, and the rest) live in the Workflows menu in the chat header — not as a list under the logo.
Start a new chat
Use the chat header at the top of the sidebar:
| Control | Action |
|---|---|
| + (New chat) | Start a fresh thread — empty composer and homepage |
| Workflows | Insert /understand, /trace, /owner, /blast, or /gaps into the composer so you can add a prompt, then send |
| Thread title dropdown | Switch between saved threads from this workspace |
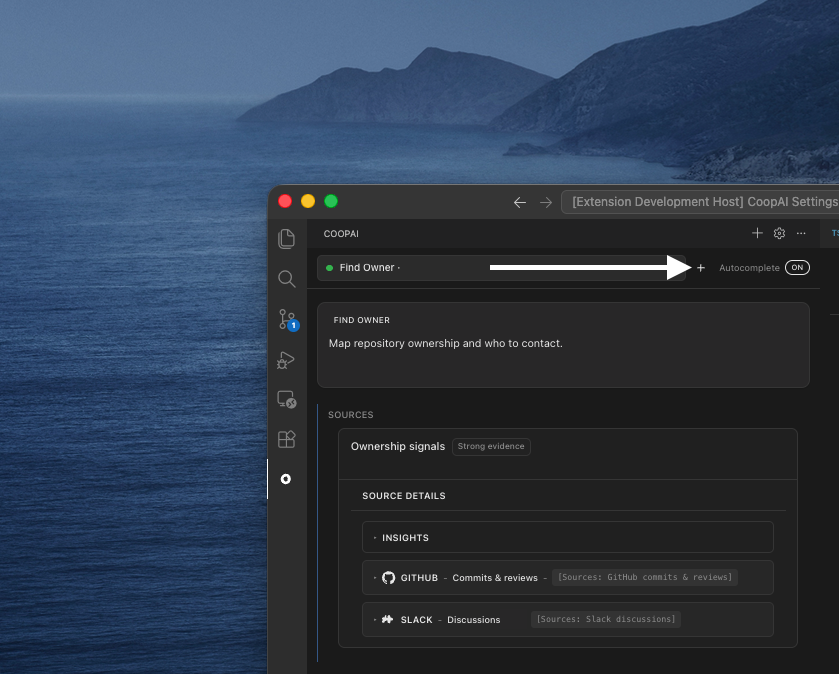
Previous threads stay in the dropdown until you delete them. Starting a new chat or switching threads does not cancel an in-flight reply — that turn keeps generating in the background (shown as “Generating…” in the thread list). Open the thread again to watch it finish, or press Stop on that thread to cancel only that turn. Quick actions and slash commands always run in the active thread.
If a past thread was working on a specific file, switching back to that thread restores the file chip and opens that file in the editor. Reloading VS Code alone does not reopen last session’s file.
Chat composer
Type free-form questions in the composer. Coop streams answers grounded in your code graph and connected integrations. On Auto, free-form chat uses OpenAI GPT-5 mini. Paid plans can pick from the model menu in chat.
- Press Enter to send (Shift+Enter for a new line).
- Responses stream in real time with markdown formatting.
- Chat history persists in the session.
Active file context chip
The chip above the composer (right side) shows which file Coop is using as chat context. It is not an @ mention.


| Badge | Meaning |
|---|---|
| L · filename · Local | File on disk — workspace, a git clone opened outside the folder, or Cmd+O / Downloads |
| R · filename · owner/repo | Remote / codehost — chosen in Coop’s file explorer (stays R even if Coop opens your local clone to view it) |
- Open a file in the editor → the chip follows the active (last-focused) text tab.
- Choose a file in Coop’s explorer → the chip updates and the file opens in the editor.
- Click the chip → focuses that file in the editor.
- Close that tab → the file chip clears.
- Reload VS Code → Coop does not reopen last session’s file or leave a ghost file chip (unless that file is already open).
- Switch back to a past chat thread that used a file → that file chips and opens again.
A repo-only chip (/RepoName) appears only when you choose Use repo in the explorer with no file selected.
With an L chip, Coop is a normal assistant on that file: chat, ghost text, and reviewable edits. You can still ask about Slack, Jira, and the other tools your admin connected. Repo slash commands (/understand, /blast, /owner, /trace, /gaps) stay on an indexed repo you picked with Use repo. Outside-workspace files (for example Downloads) stay L. See Can I use Coop on a local file?.
@-mentions and attachments
- Type
@to search files and attach extra paths for one message (up to 3 @-mentions). These are separate from the active-file chip above. - Use the paperclip to attach files — images, PDFs, or text (up to 4 per message).
- Selected lines in the editor are included automatically as context.
Slash commands
Type / in the composer to see available commands. Workflows in the chat header inserts the same tokens (you add a prompt, then send). Quick actions:
| Slash | Action |
|---|---|
/understand | Understand Repo |
/trace | Trace Decision |
/owner | Find Owner |
/blast | Blast Radius |
/gaps | Knowledge Gaps |
/edit | Edit code — GPT-5.1 (aliases: /patch, /fix). After Apply, click Create pull request on the card, or type Create a PR in chat (also works after you type in the file) |
Integration commands: /slack, /jira, /confluence, /notion, /docs. /teams is not available yet.
Settings overview
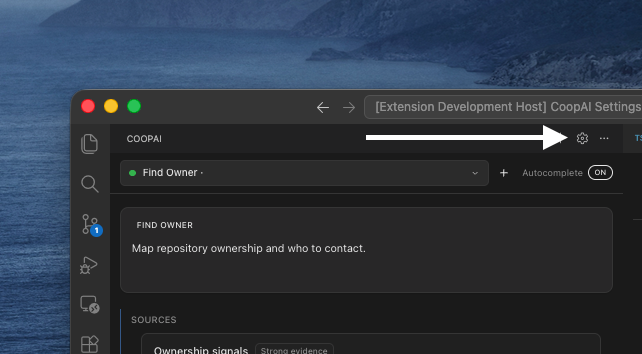
Open CoopAI Settings from the gear icon in the sidebar title bar (opens a dedicated settings tab). You can also run CoopAI: Open Settings from the Command Palette.
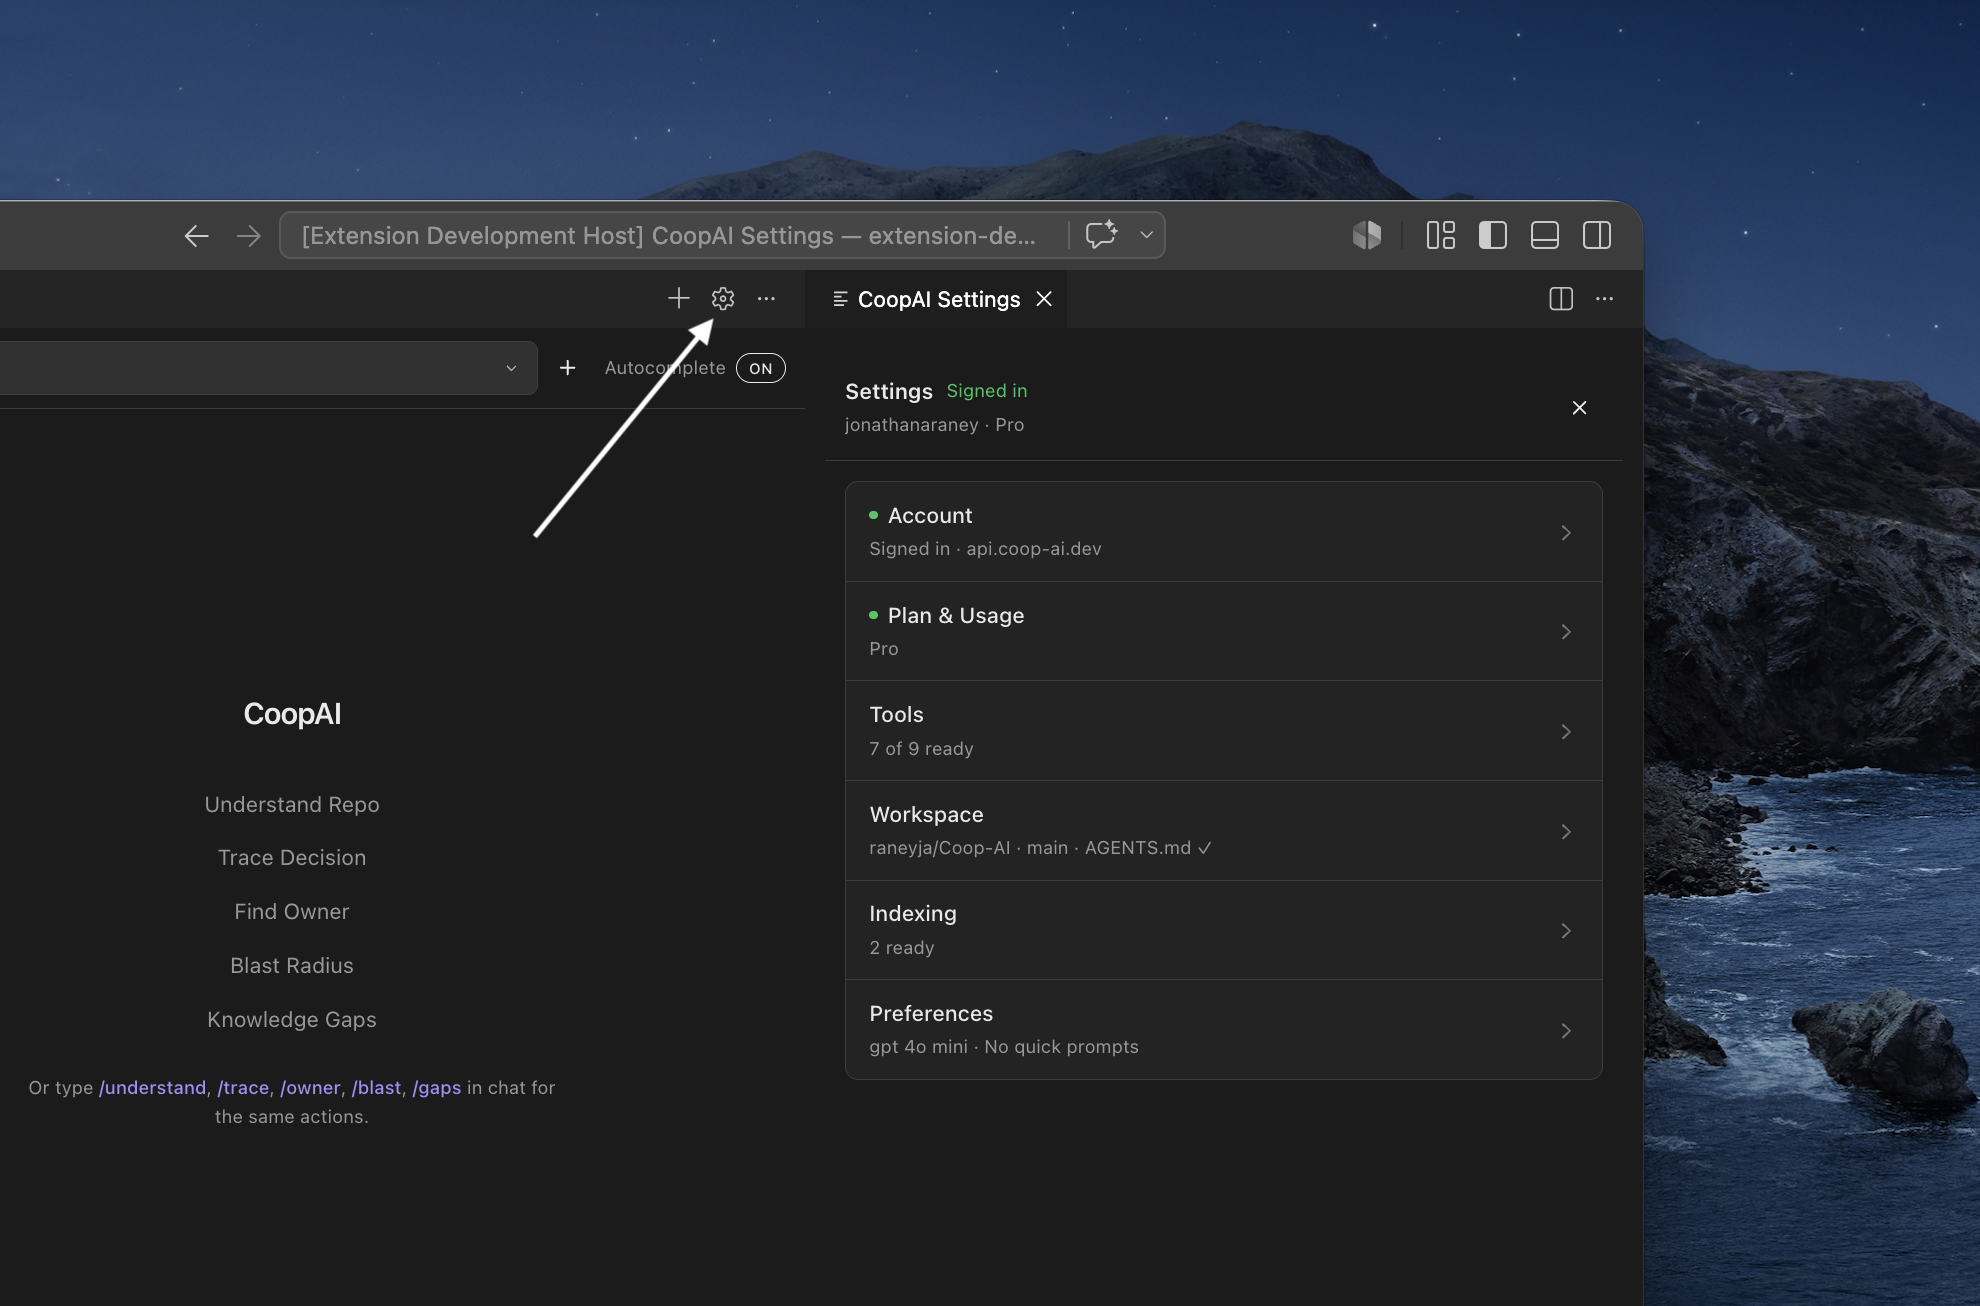
| Screen | Purpose |
|---|---|
| Account | Sign in (Google, email, SSO); signed-in org/plan + Sign out |
| Plan & Usage | Current plan, usage summary, upgrade path |
| Tools | Code hosts and integrations (production: read-only status; dev mode: PAT entry) |
| Workspace | Owner, repo, branch defaults |
| Indexing | Lightning Mode status and indexed repos (all plans; free capped at 3) |
| Preferences | Assigned models, prompt library, timezone |
Right-click any selection in the editor to run Trace Decision, Find Owner, Blast Radius, or Knowledge Gaps immediately. Understand Repo is repo-wide only — after Use repo, open Workflows → Understand Repo (inserts /understand) or type /understand, add what you’re working on, then send.
Model assignments
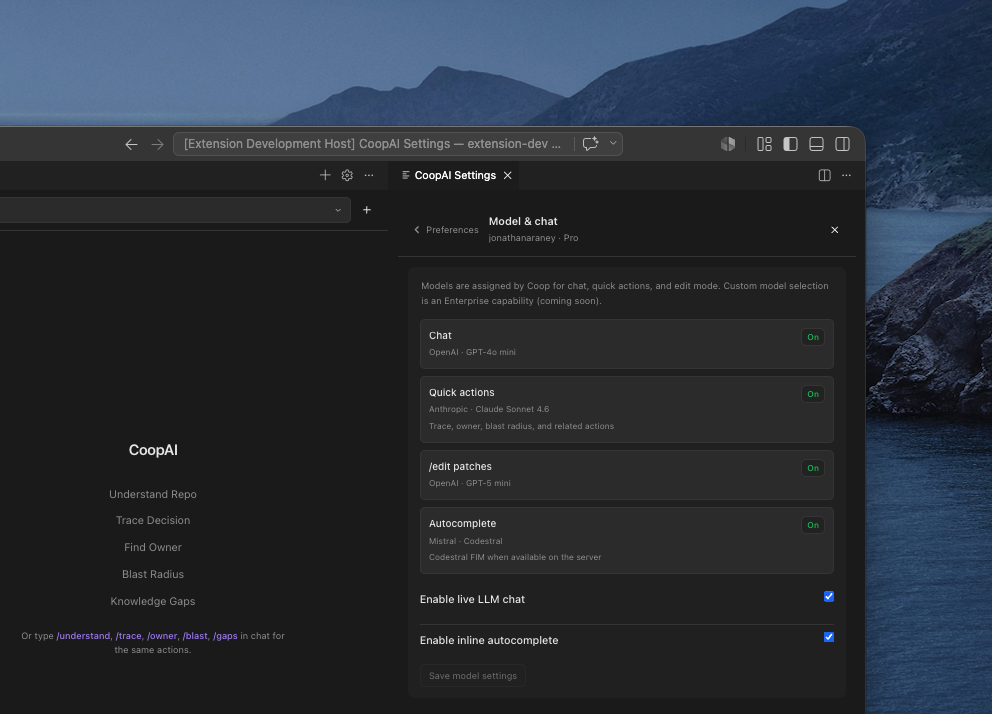
Auto (the default) means Coop picks a model per job. Open Settings → Preferences → Model & chat to see what Auto uses.
On Pro, Pro+, Max, and Enterprise, pick a specific OpenAI, Anthropic, or Gemini model from the model menu in chat. Chat, quick actions, and /edit follow that pick. Autocomplete stays on Codestral. Free stays Auto-only.
| Feature | What Auto uses |
|---|---|
| Chat | OpenAI GPT-5 mini |
Quick actions + integration chat (/slack, /jira, …) | Anthropic Claude Sonnet 4.6 |
/edit, /patch, /fix | OpenAI GPT-5.1 |
| Autocomplete | Mistral Codestral |
Create pull request Notes use OpenAI GPT-4o mini and are labeled (AI Generated) — you can edit them before submit.
One toggle remains editable on this page:
| Toggle | Effect |
|---|---|
| Enable inline autocomplete | Inline ghost text (syncs with the header Autocomplete toggle) |
Chat, quick actions, and edit patches are always on. Click Save model settings after changing the autocomplete toggle. Change models from chat, not from this page.
Inline complete and edit selection
Inline complete — Ghost-text autocomplete as you type. Off by default for new installs. Coop routes completions to Mistral Codestral (FIM).
Turn it on from Settings → Preferences → Model & chat → Enable inline autocomplete → Save model settings. Preferences persist at global scope.
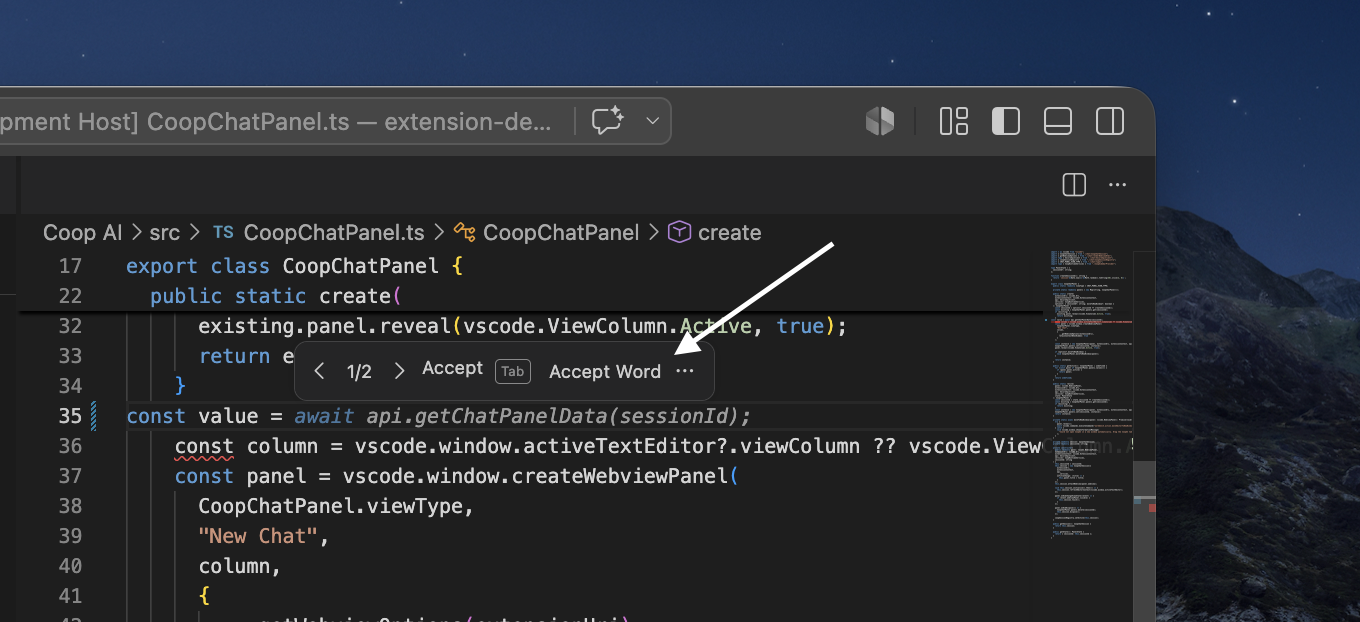
| Step | Surface | Action |
|---|---|---|
| Settings | Extension UI — Settings → Preferences → Model & chat | Enable inline autocomplete → Save model settings |
| Enable | File — VS Code settings | Set "coopAI.autocomplete.enabled": true |
| Manual trigger | Extension UI — Command Palette | CoopAI: Trigger Inline Autocomplete |
| Accept | Editor | Tab |
| Reject | Editor | Escape |
How it works:
- VS Code
InlineCompletionItemProvidershows streaming ghost text - FIM (fill-in-the-middle) sends
prefix+suffixsegments whencoopAI.autocomplete.useFimistrue(default) — routed to assigned Mistral Codestral - Hot Streak keeps completions snappy after Tab-accept; Smart Throttle adapts debounce to typing speed and latency
- Multi-line completions activate after
{,=>,(, or inside blocks (up to 200 tokens) - Indexed repos: when the workspace repo is Deep-Indexed and index status is ready, graph context (dependents and ownership) is attached automatically if autocomplete is on. Set
coopAI.autocomplete.useGraphContexttotrueto force graph on; leave atfalse(default) for auto when indexed (all plans)
Copilot: when Coop autocomplete is on, Coop automatically disables Copilot inline ghost text (github.copilot.enable) and restores your prior setting when you turn Coop autocomplete off. Copilot chat and other features stay available.
Full guide: Inline autocomplete.
Edit selection — Shipped. Highlight code, send /edit, /patch, or /fix with a named change (the defect or desired behavior), then Apply the generated patch from the VS Code notification. A highlight plus fix this is not a spec. Coop routes edit patches through OpenAI GPT-5.1, attaches the full active file (selection is a focus hint, not a context window cut), and includes your editor selection text when present (coopAI.includeSelection, default true).
| Step | Surface | Action |
|---|---|---|
| Generate | Extension UI — chat composer | /edit <instruction> (or /patch, /fix) with a named change plus a selection or open file. Example: /edit if headers is undefined, return undefined. do not touch requireAuth. |
| Apply | Extension UI — notification | Click Apply on "Patch ready — …" |
| Or apply | Extension UI — Command Palette | CoopAI: Apply Patch (coopAI.applyPatch) |
| Undo | Extension UI — notification or Command Palette | Undo after apply, or CoopAI: Undo Last Patch (coopAI.undoLastPatch) |
Full guide: Edit mode.
Completion-only routing — Inline requests use a separate zero-retention path (x-use-case: code-completion-only), distinct from chat.
Create a pull request
You can open a pull request for your team without leaving VS Code.
Three ways — all open the same confirm step. Cancel, Escape, or clicking away creates nothing.
- Click Create pull request on a patch card — that Apply only.
- Type Create a PR in chat after Apply — every
/edityou Applied in this thread. - Type Create a PR in chat after editing a Use-repo file — dirty buffers, no Apply required. Unsaved is fine.
There is no /pr slash command. On a local file, Apply and Undo still work, and Create pull request stays disabled.
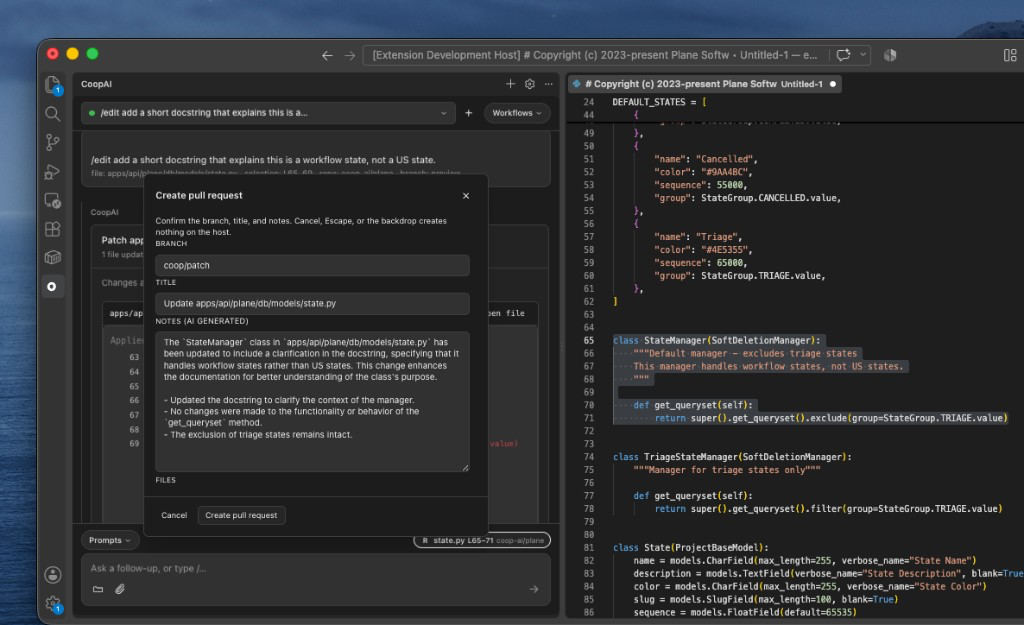
Open a pull request
- Select the repository with Use repo.
- Either Apply an
/edit, or type in a Use-repo file. - Click Create pull request on a card, or type Create a PR in chat.
- Review Branch (default
coop/patch), Title, and Notes (AI Generated). Edit anything you want. - Click Create pull request. Coop shows a link — open it to see the PR. Or Cancel.
| Field | Default |
|---|---|
| Branch | coop/patch |
| Title | Update path/to/file (or Update N files) |
| Notes (AI Generated) | A short summary you can edit or clear |
| Files | That card, every Apply in this thread, or dirty Use-repo tabs |
Undo restores the editor. It does not close the PR.
Full guide: Create pull request.
Quick Actions
Start quick actions from the Workflows menu in the chat header, slash commands in chat (/understand, /trace, /owner, …), or the editor context menu. Workflows inserts the matching slash command into the composer so you can add a prompt (for example /understand focus on auth) and then send. Right-click a selection to run Trace Decision, Find Owner, Blast Radius, or Knowledge Gaps immediately. Understand Repo is not file-scoped; after Use repo, use Workflows → Understand Repo or type /understand. On Auto, structured quick actions and integration slash commands (/slack, /jira, …) use Anthropic Claude Sonnet 4.6. A paid pick from the model menu in chat applies here too.
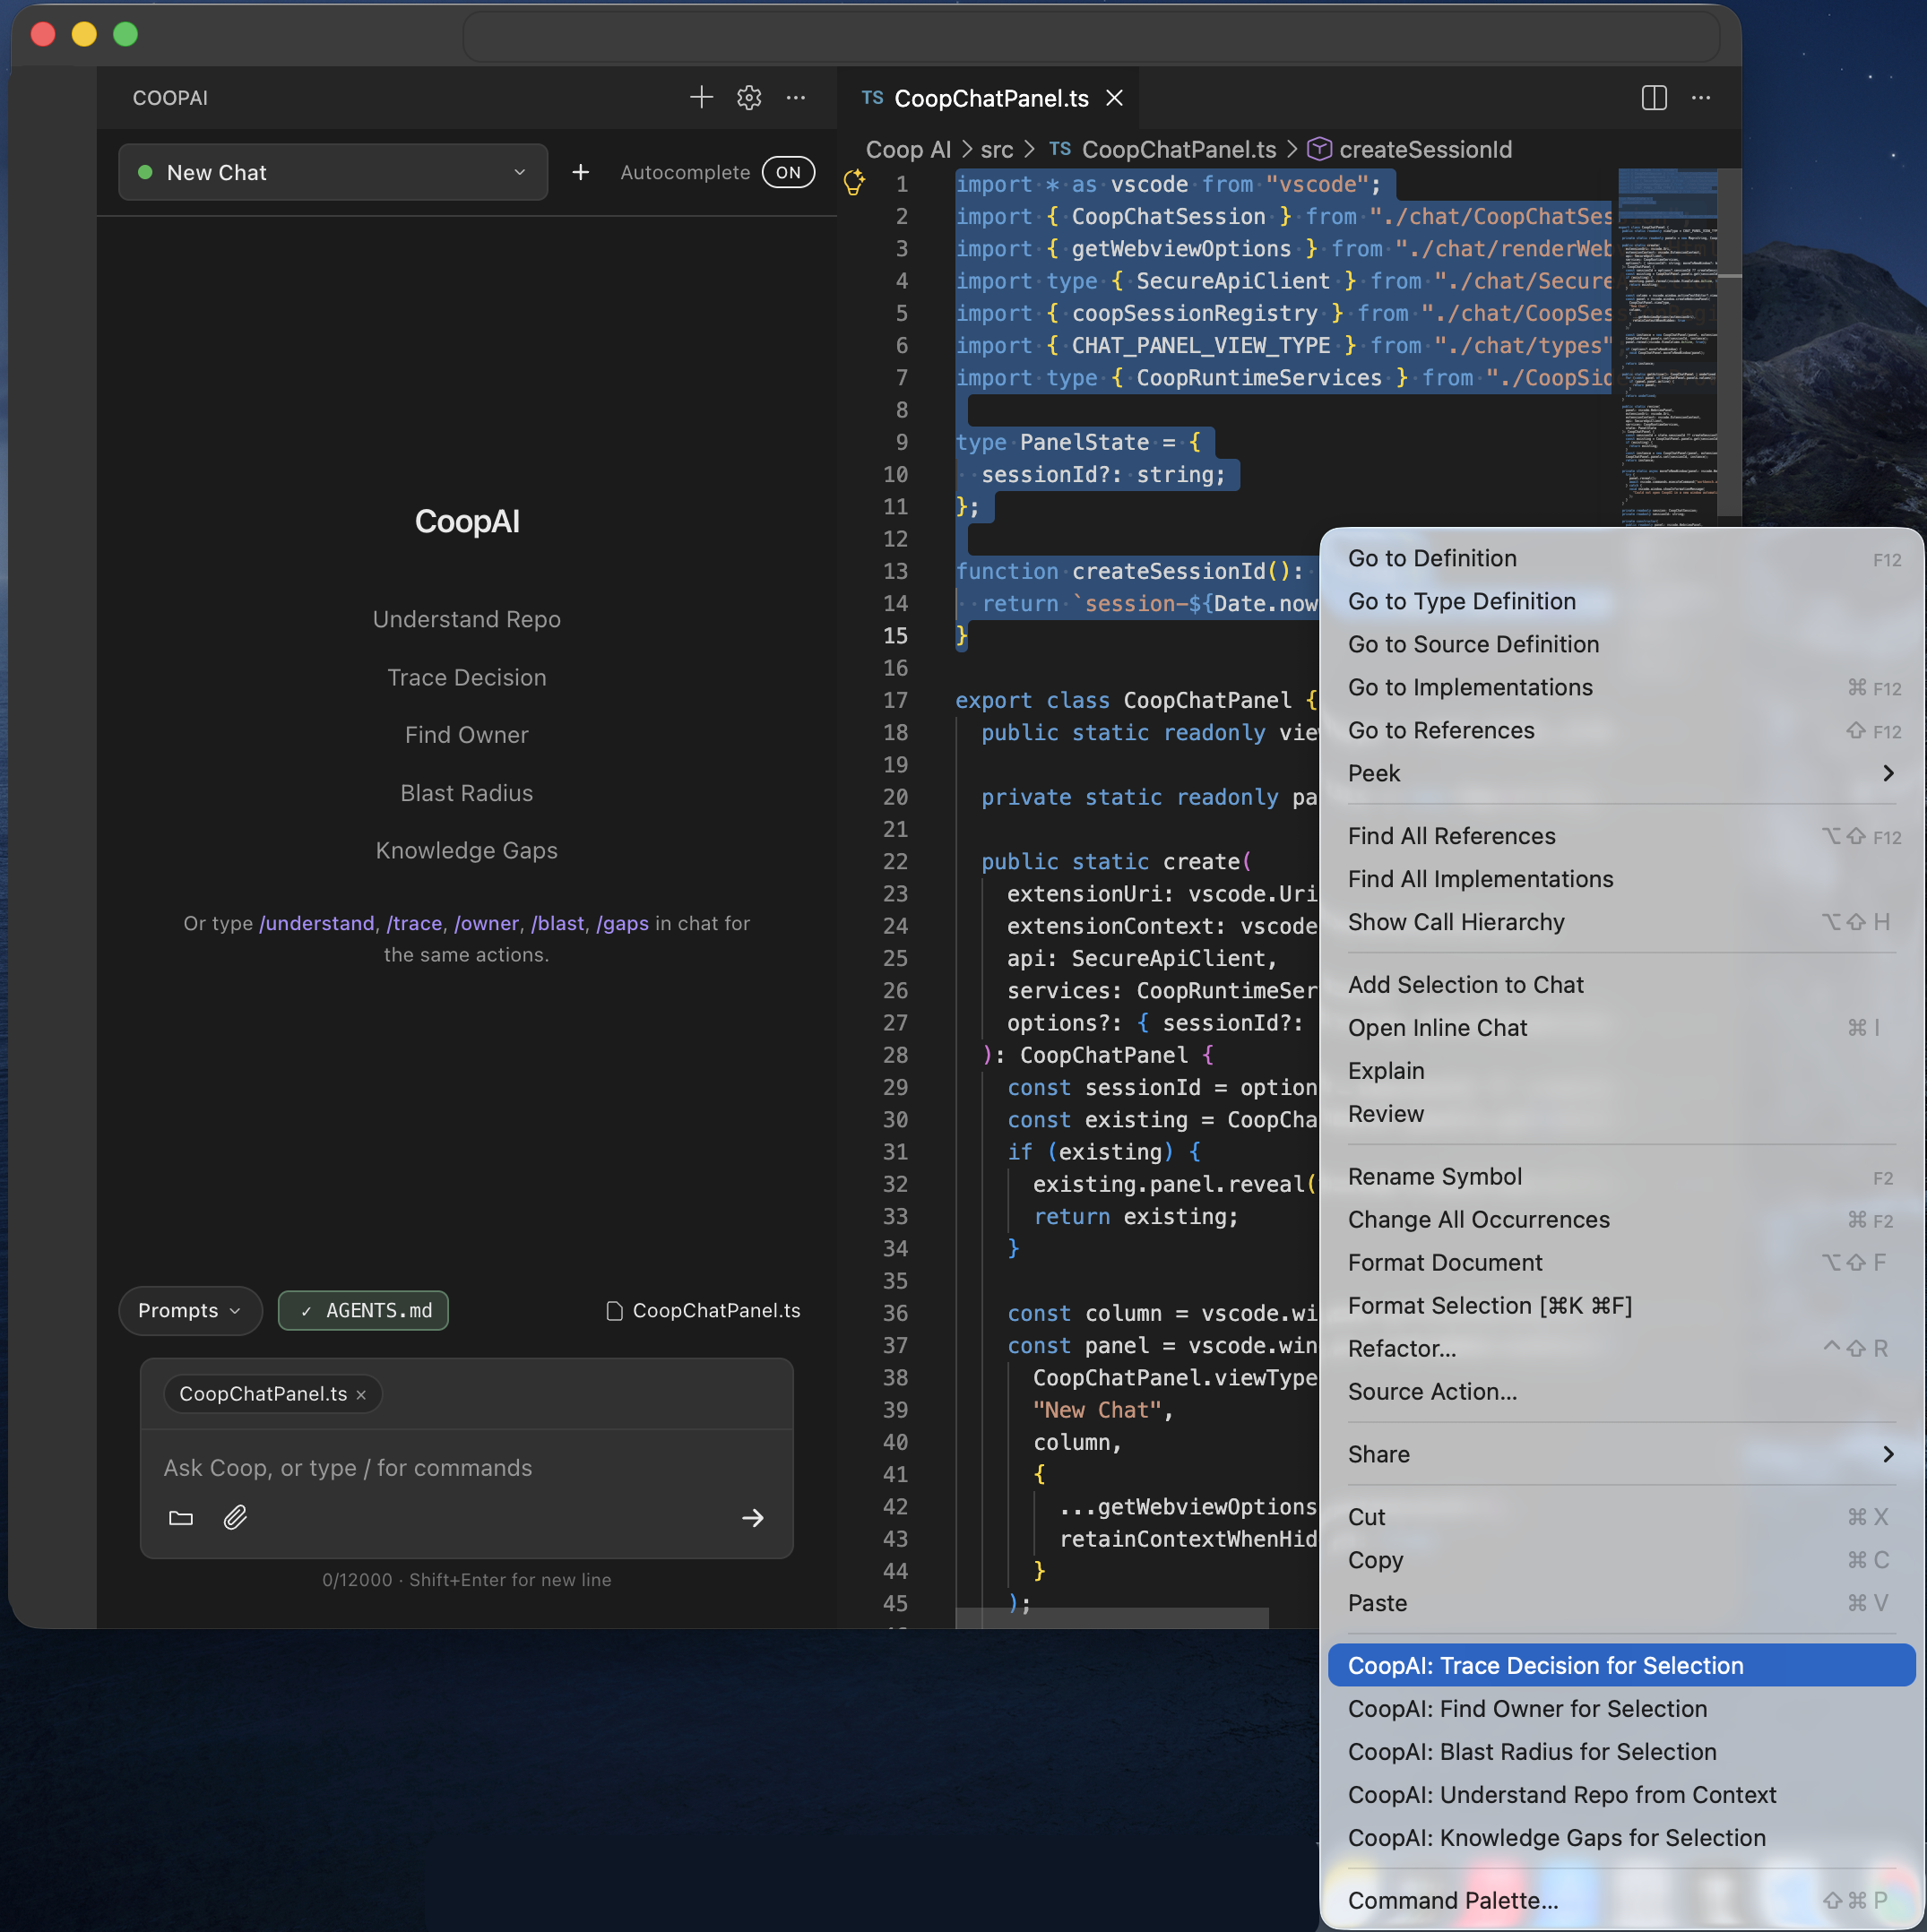
When to use each action
| Action | Best for |
|---|---|
| Understand Repo | Onboarding, architecture questions, "where do I start?" — repo selected via Use repo |
| Trace Decision | "Why was this written this way?" before changing legacy code |
| Find Owner | CODEOWNERS vs blame mismatches, reviewer suggestions |
| Blast Radius | Refactors, API changes, pre-merge impact analysis |
| Knowledge Gaps | Pre-ship audits, stale docs, missing runbooks |
Understand Repo
Slash: /understand (aliases: /understandrepo, /repo, /architecture, /explain)
Requires: An explicit Use repo selection in the Remote workspace picker (repository row, not a file). Settings → Workspace owner/repo alone does not unlock it.
Ignores individual files: If a file chip is active (open editor file or remote file pick), Workflows → Understand Repo and /understand stay blocked until you click Use repo on the repository. This action never deep-dives a single file — use plain chat, Trace Decision, or Blast Radius for that.
Select a repository (then run Understand Repo)
- Extension UI — Open the remote file / repos picker (repos control in the Coop sidebar).
- Select the repository (not a file) and click Use repo.
- Success: a repo-only chip (
/RepoName), In use on the picker, and Understand Repo available from Workflows or/understand.
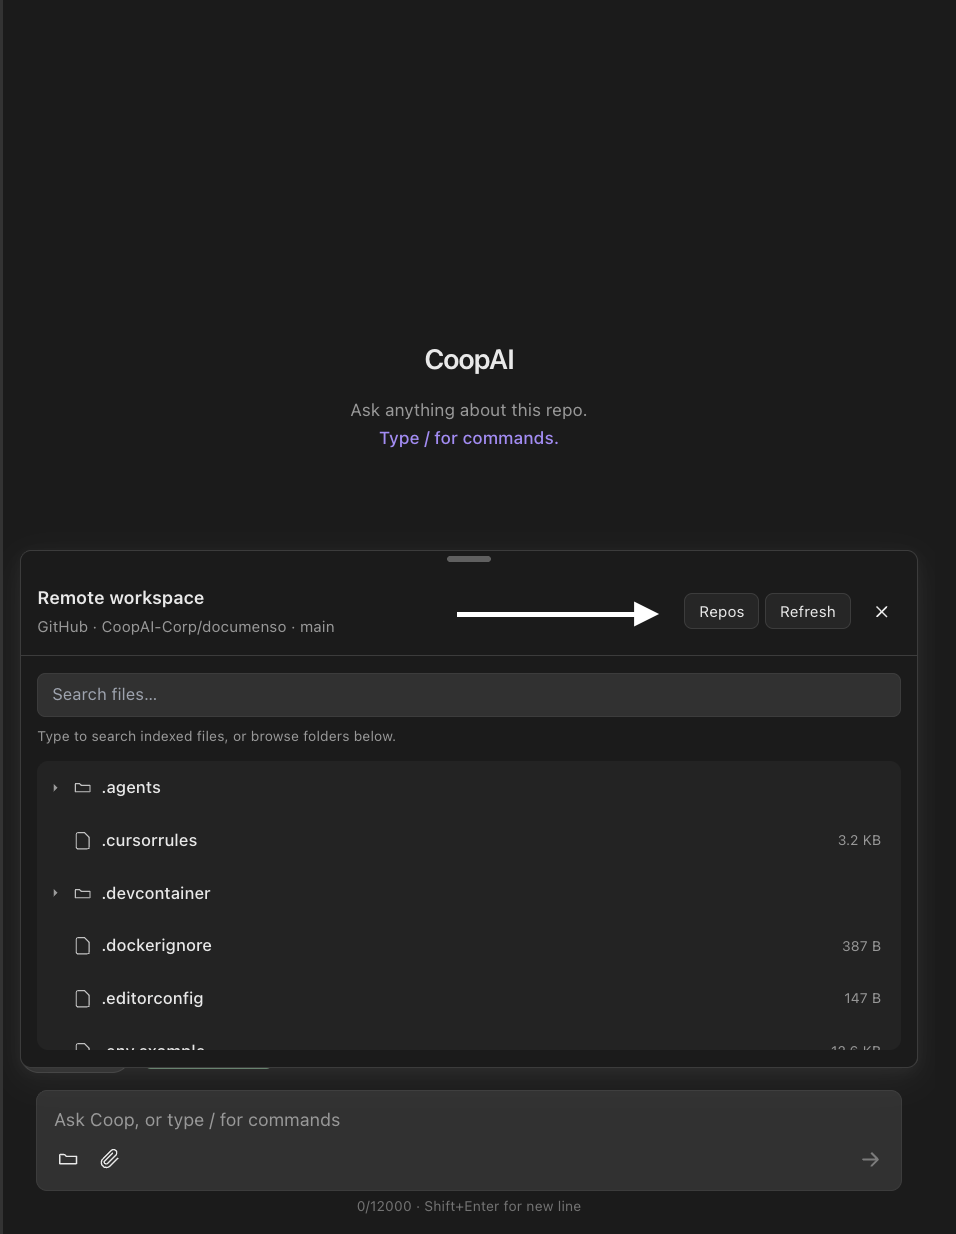
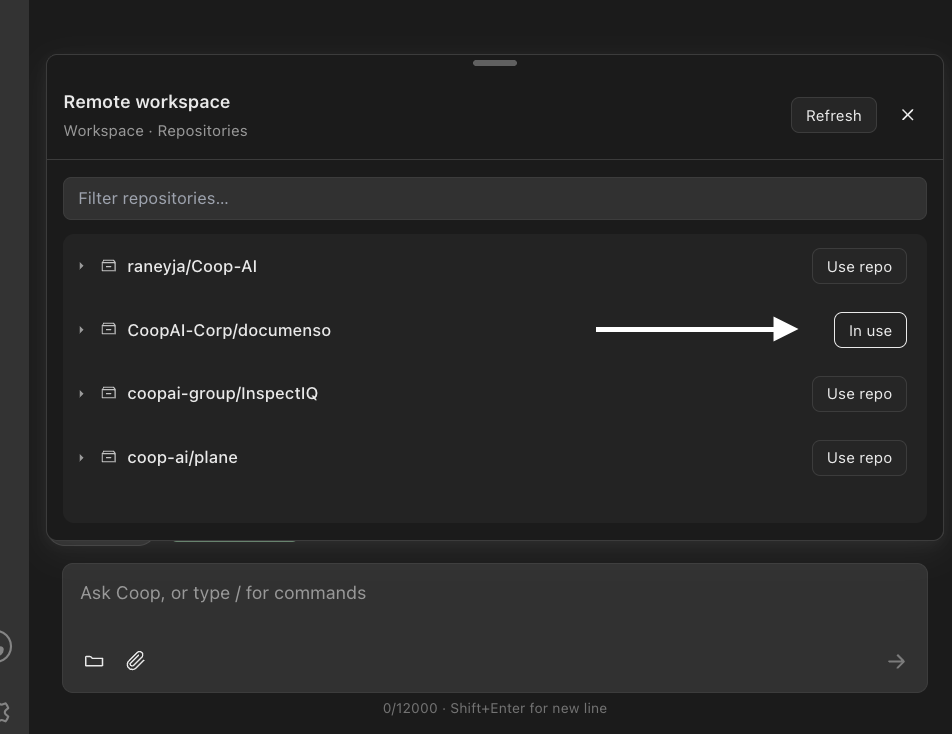
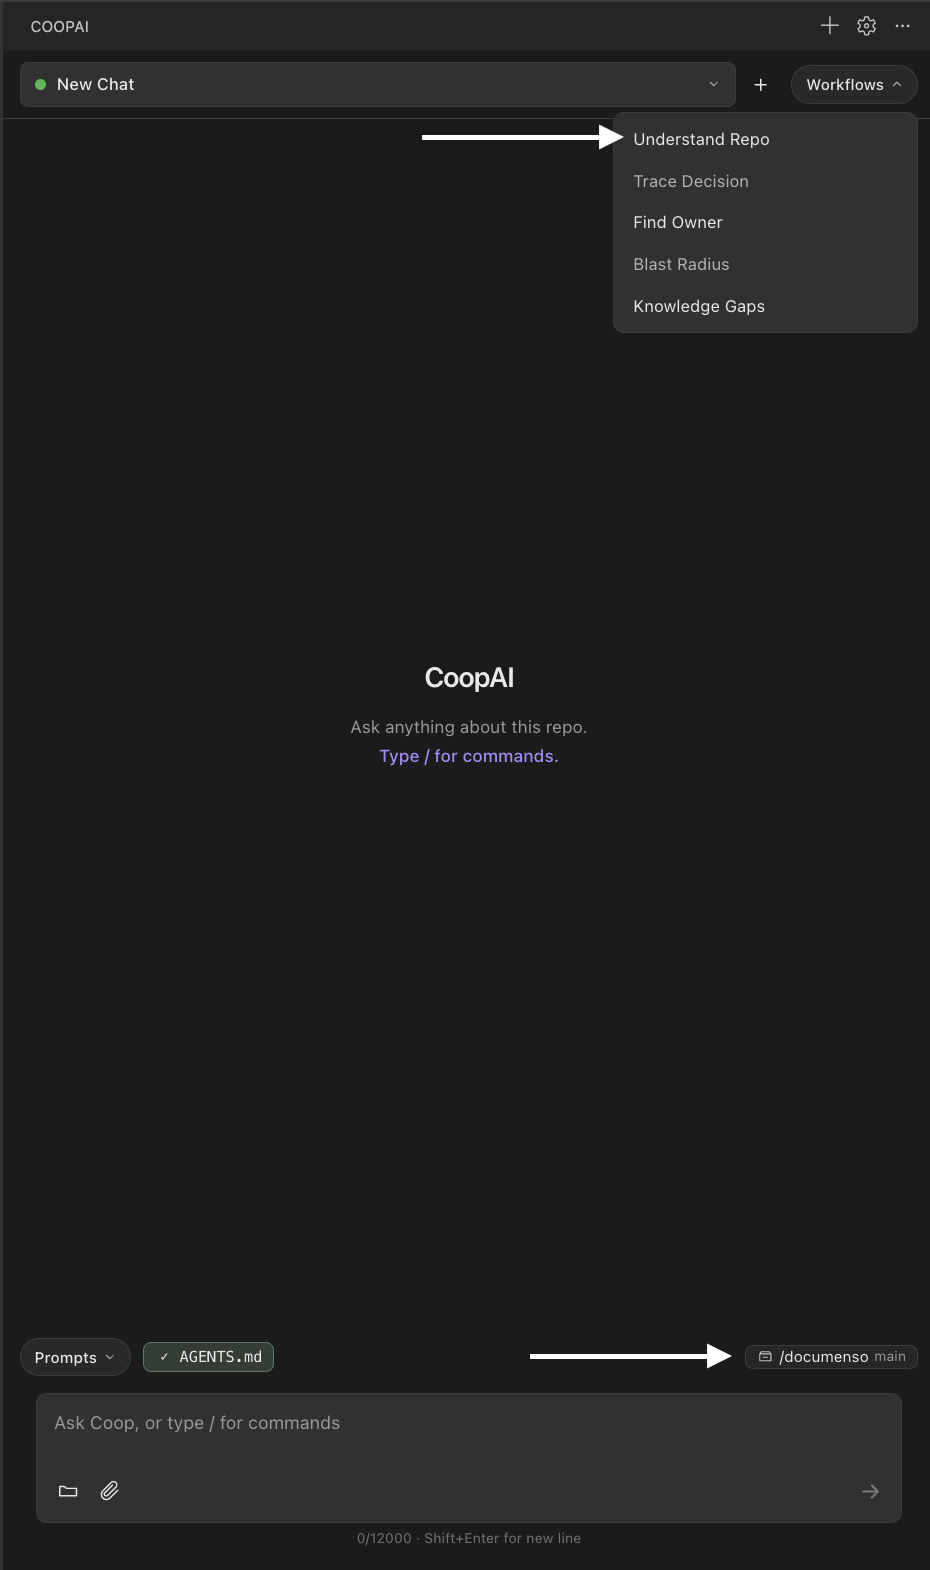
Default prompt: "Understand this repository's architecture, subsystems, and risks."
What you get: A repo-wide overview (Summary → Architecture → Key subsystems → Entry points → Risks & unknowns → optional Related documentation → Suggested next steps → Sources), plus a Sources / evidence card when index and integrations return in time.
Example:
I'm onboarding to coop-backend — where does webhook ingestion start, and how do events flow into the job queue vs GraphCache? What are the 5 files I should read first to trace a GitHub push end-to-end?
/understand focus on the webhook ingestion path
Trace Decision
Slash: /trace (aliases: /why, /decision, /history)
Requires: An open file in the editor.
Default prompt: "Trace the engineering decision behind this code."
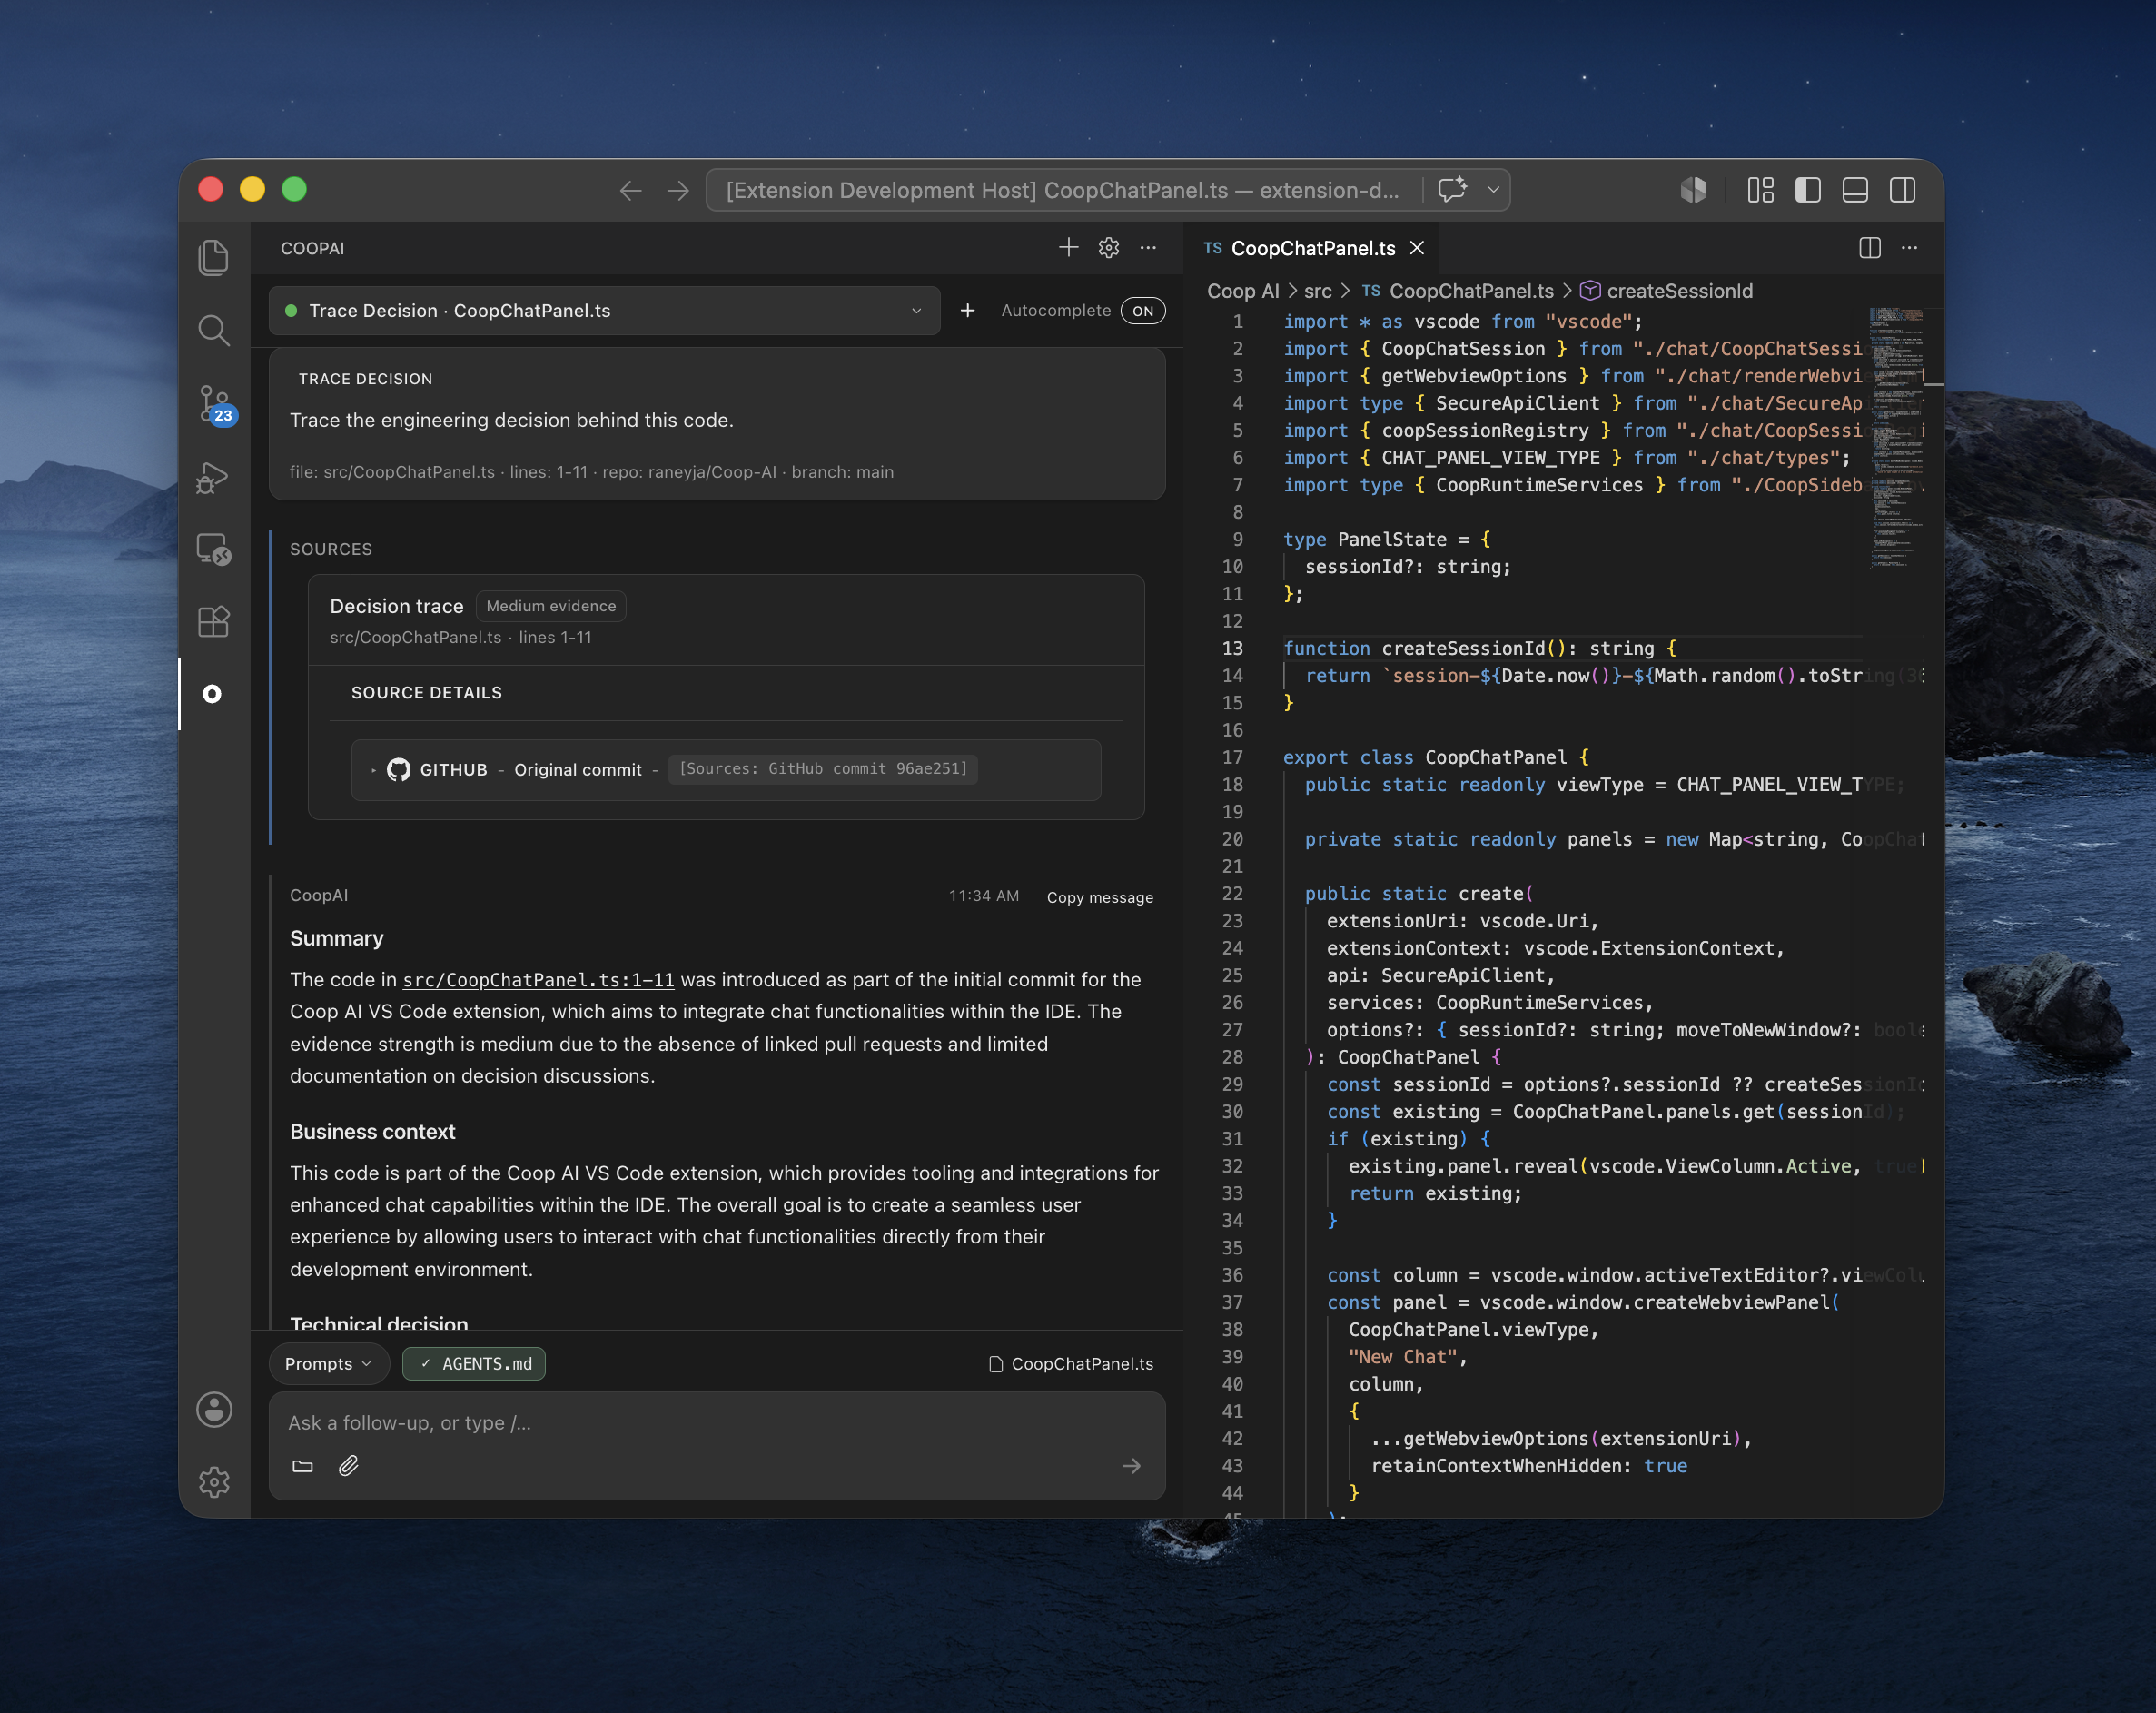
Example:
Pull the Slack thread and Jira ticket tied to auth_middleware.go — why did we add zero-retention headers here? Cross-reference commits on internal/llm/router.go from the last 90 days.
/trace why was zero-retention added here
Find Owner
Slash: /owner (aliases: /who, /find-owner)
Works without open file: Yes — with Use repo in the Remote workspace picker, or with a file chip. Settings → Workspace owner/repo alone is not enough.
Default prompt (file): "Find who owns this area and how to reach them."
Default prompt (repo-wide): "Map repository ownership and who to contact."
Example:
Who owns services/billing/invoice_handler.go? CODEOWNERS says @platform-payments but git blame shows @marcus. Does pkg/ledger/posting.go share the same on-call rotation?
Blast Radius
Slash: /blast (aliases: /impact, /blast-radius)
Requires: An open file in the editor.
Default prompt: "Estimate the impact of changing this code."
Example:
If I refactor TokenValidator.validate() in internal/auth/token_validator.ts, what breaks downstream? List dependents in api-gateway, workers/webhook-processor, and any shared libs.
/blast what breaks if I change the token validator
Knowledge Gaps
Slash: /gaps (aliases: /unknowns, /knowledge-gaps)
Works without open file: Yes — with Use repo, or with a file chip. Settings → Workspace alone is not enough.
Default prompt (file): "Audit documentation and ownership gaps for this area."
Default prompt (repo-wide): "Audit documentation and ownership gaps across this repository."
Example:
Before I ship changes to GraphConsistencyManager.applyEvent(), what am I missing? Any Slack threads or Jira tickets on webhook dedupe?
File-level vs repo-wide
| Action | Scope | Notes |
|---|---|---|
| Understand Repo | Repo only | Use repo required; blocked while a file chip is active; never binds to a single file |
| Find Owner | File or repo | File chip or Use repo (not Settings prefs alone) |
| Knowledge Gaps | File or repo | File chip or Use repo (not Settings prefs alone) |
| Trace Decision | File only | Requires open file / selection |
| Blast Radius | File only | Requires open file / selection |
Integration slash commands
On Auto, integration commands query connected tools with the same Anthropic Claude Sonnet 4.6 routing as quick actions.
| Slash | Description |
|---|---|
/slack | Answer using Slack discussions as primary evidence |
/jira | Answer using Jira tickets as primary evidence |
/teams | Not available yet |
/confluence or /wiki | Answer using Confluence pages |
/notion | Answer using Notion pages |
/docs, /googledocs | Search Google Docs only — not the repository |
Example: /slack what did #platform-auth decide about session TTL?
Prompt Library
Saved prompts in the sidebar
Click Prompts in the chat composer footer to open a dropdown of your pinned prompts. Select a prompt to insert it into the composer with current file and workspace context filled in. Press Send when you are ready.
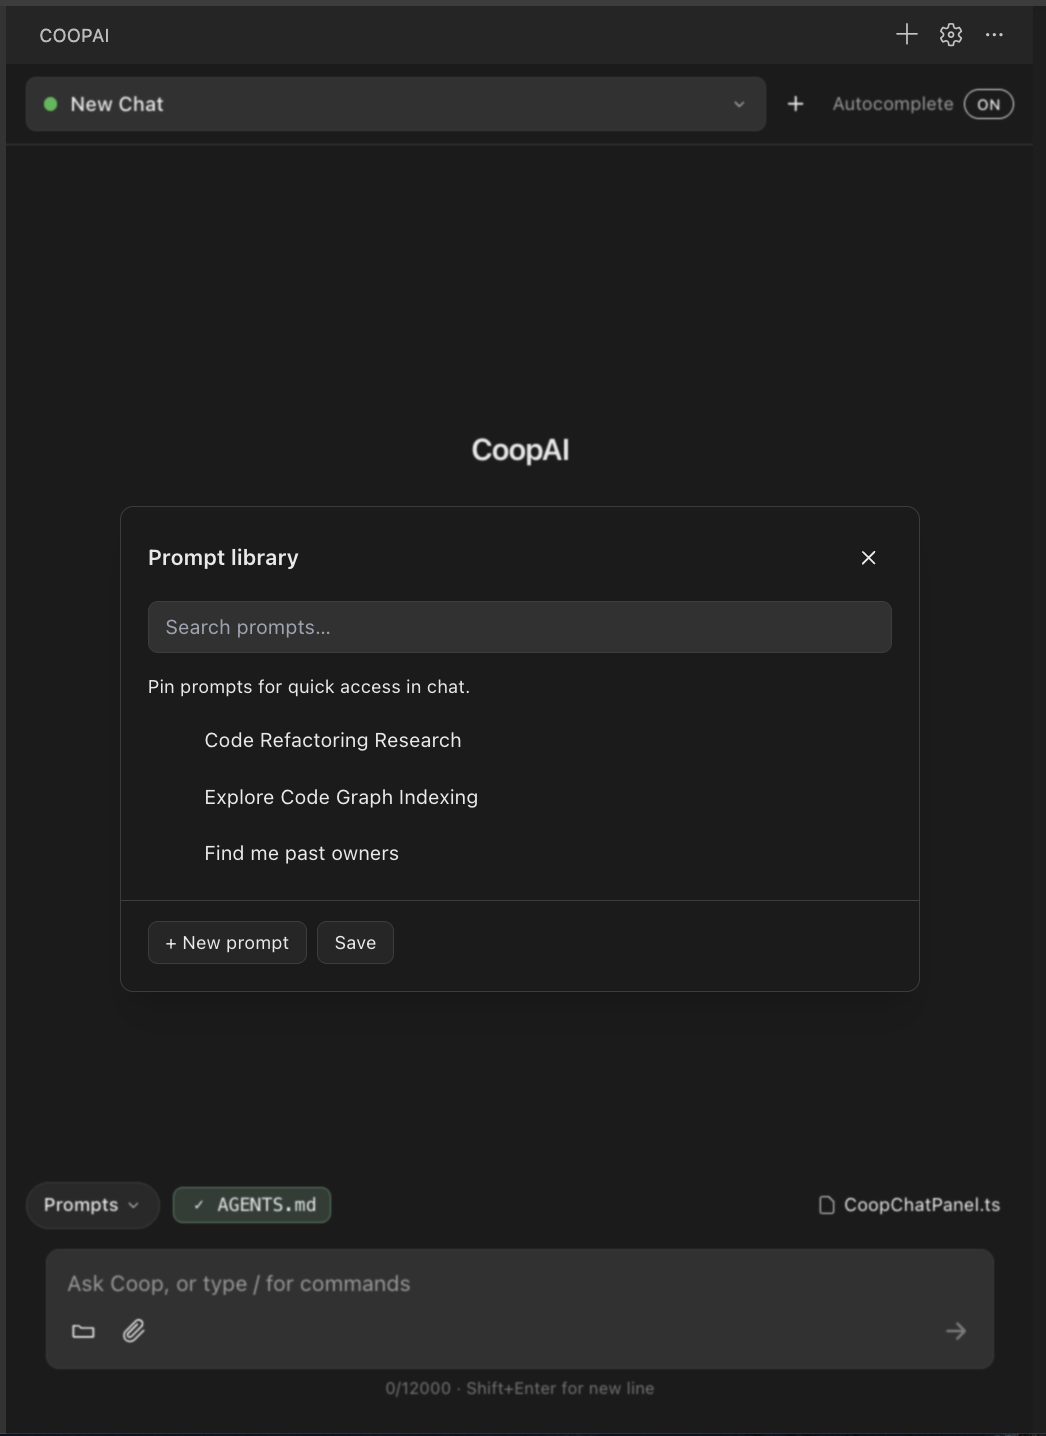
If you already have text in the composer, the saved prompt is appended below it.
Pin your top 5
- Extension UI — Open Settings → Preferences → Prompt library, or click See all prompts… in the Prompts dropdown.
- Pin up to 5 prompts — they appear in the Prompts dropdown.
- Drag pinned rows to reorder them. Click Use on any row to insert it into the composer.
Save a prompt from chat
- Extension UI — Type a prompt in the chat composer.
- Click Save to library (shown when you have a workspace open and text in the composer).
- Name the prompt and click Save. Coop writes it to
.coop/prompts.jsonand links a quick action automatically when the text starts with a slash command like/understand.
Workspace prompts file
Teams share prompts via .coop/prompts.json in the repository root. Commit it to git so everyone gets the same library.
Template variables
At run time, Coop substitutes:
| Variable | Source |
|---|---|
{{file}} | Current editor file path |
{{lines}} | Selected line range |
{{owner}} | Workspace owner setting |
{{repo}} | Workspace repo setting |
{{branch}} | Workspace branch setting |
Link prompts to quick actions
Set actionId on a prompt to route through a quick-action pipeline:
| actionId | Quick action |
|---|---|
understand-repo | Understand Repo |
trace-decision | Trace Decision |
find-owner | Find Owner |
blast-radius | Blast Radius |
knowledge-gaps | Knowledge Gaps |
When actionId is set, your template becomes the user intent appended to the action — not a replacement for Coop's model prompt.
Example team prompts
{
  "version": 1,
  "prompts": [
    {
      "id": "onboard-webhooks",
      "title": "Onboard: webhook flow",
      "template": "Trace webhook ingestion from HTTP handler to job queue. List the 5 files to read first.",
      "actionId": "understand-repo"
    },
    {
      "id": "pre-ship-gaps",
      "title": "Pre-ship gap check",
      "template": "Audit {{file}} for missing docs, unclear ownership, and open questions before I merge.",
      "actionId": "knowledge-gaps"
    },
    {
      "id": "refactor-impact",
      "title": "Refactor impact",
      "template": "What breaks if I change {{file}}? Prioritize cross-service dependents.",
      "actionId": "blast-radius"
    },
    {
      "id": "pr-reviewers",
      "title": "Suggest PR reviewers",
      "template": "Who should review changes to {{file}} on branch {{branch}}? Prefer blame-aware experts.",
      "actionId": "find-owner"
    },
    {
      "id": "incident-trace",
      "title": "Incident decision trace",
      "template": "/trace link commits and tickets for the last auth incident in {{repo}}",
      "actionId": "trace-decision"
    }
  ]
}
Pin onboard-webhooks, pre-ship-gaps, refactor-impact, pr-reviewers, and incident-trace as your top 5.
AGENTS.md
What AGENTS.md is for
AGENTS.md is your repository's operator manual for AI tools — canonical URLs, docs links, UI conventions, and setup surfaces. It lives in git alongside your code, not on the marketing site.
This Owner's Manual (what you're reading) is product documentation. Your repo's AGENTS.md is project-specific guidance for Coop, Cursor, and other agents working in that codebase.
What to put in it
- Canonical URLs (API, admin portal, docs)
- Build and test commands
- Architecture overview and internal API conventions
- Rules for how agents should give setup instructions to users
- Pointers to deeper docs in your repo
How Coop uses it
When project instructions are enabled, Coop loads AGENTS.md (and subtree-specific files in large monorepos) on every chat turn — not only for Understand Repo. Create or upload a personal file in Settings → Preferences → AGENTS.md. Keep the top-level file general; add subtree-specific AGENTS.md files for large monorepos.
Keep it tool-agnostic
Write AGENTS.md so any AI assistant can follow it — plain Markdown, explicit surfaces (File / Terminal / Browser / Extension UI), and links to deeper docs in your repo. Avoid editor-specific config syntax so the same file helps every teammate regardless of the tools they use.
For large monorepos, add a nested AGENTS.md inside individual service or package folders. Coop loads the nearest file for the code you're working in, so root-level conventions stay general while service-specific notes live next to the code.
Example AGENTS.md skeleton
# Agent guide — my-project

## Canonical URLs

| Purpose | URL |
| --- | --- |
| API | https://api.example.com |
| Staging | https://staging.example.com |

## Build & test

- `npm run build` — production build
- `npm test` — unit tests
- `npm run lint` — ESLint

## Architecture

Brief overview of services, entry points, and where to find docs.

## Agent instructions

When giving setup steps, name the surface (File / Terminal / Browser / Extension UI).
Ask Coop: "Update AGENTS.md based on what I told you in this thread" to generate or refresh it.
Developer vs Pro
| Feature | Developer (free) | Pro |
|---|---|---|
| Local workspace context | Yes | Yes |
| AI usage | 15 messages / rolling 6-hour window; $1.75 per-window and $7 weekly caps | Higher limits (seat-based billing) |
| Model selection | Auto only | Model menu in chat (OpenAI, Anthropic, Gemini). Auto still available. |
| Code hosts & integrations | Yes (admin portal) | Yes |
| Deep-Index / Lightning Mode | Yes (3 repos org-wide) | Yes (unlimited) |
| Team seats | Individual only (1 seat) | Multi-seat |
| Collections | No | Yes |
| Cross-repo search | Deep-Indexed repos (up to 3) | Unlimited indexed repos |
See Pricing for current limits and upgrade paths.
When to ask your admin
In production mode, org admins connect code hosts and collaboration tools once in the admin portal. Individual developers sign in to Coop — they do not paste OAuth tokens in VS Code.
Ask your admin if:
- Quick actions return "integration not connected"
- You need a teammate invited or more than 3 Deep-Indexed repos (upgrade to Pro)
- Teammates need invites or seat assignments
Full admin setup is covered in the Documentation hub.
Troubleshooting
| Problem | Fix |
|---|---|
| Not signed in | Settings → Account — use Google, Continue with email, or Sign in with SSO (Enterprise) |
| /trace or /blast disabled | Open a file in the editor first |
| /understand or Understand Repo blocked | Click Use repo on the repository in the Remote workspace picker (not a file). A file chip blocks this action — it is repo-wide only |
| Repo-wide /owner or /gaps fails | Click Use repo, or open a file so a file chip is active. Settings → Workspace alone is not enough |
| No Slack/Jira context | Ask admin to connect integrations in admin portal |
| Forgot password | coop-ai.dev/forgot-password or Forgot password? on the password step |
| Can't sign in | Verify email is verified; try Google; Enterprise: enter org name → Sign in with SSO (browser handoff) |
sso_required | Org enforces SSO — use Continue with SSO on admin portal login or Sign in with SSO in the extension |
sso_not_configured | Admin: Settings → Single sign-on → save IdP config with Enable SSO checked |
missing_org | Enter Organization name before starting SSO |
saml_validation_failed | Check IdP cert expiry, clock skew, Entity ID / ACS URL match — see SAML SSO troubleshooting |
| SP URLs empty in admin | Operator: set COOP_PUBLIC_BASE_URL on API server and restart — not a user/extension setting |
| Missing email in SAML assertion | IdP admin: map email attribute or use email-format NameID — Single Sign On (SSO) |
| Autocomplete turned off unexpectedly | Preference persists globally — re-enable via header Autocomplete toggle or Settings → Preferences → Model & chat → Enable inline autocomplete. Remove stale coopAI.autocomplete.enabled: false from workspace .vscode/settings.json if present |
Support
- Email: support@coop-ai.dev
- Demo / enterprise: Book a demo
- Documentation: Docs hub for admin portal, integrations, API reference, and enterprise deployment
- Enterprise SSO: Single Sign On (SSO) setup · SAML SSO troubleshooting error codes
- Security questions: Security page